Birdseed Ornaments: Eco-Friendly Spring Treats for Backyard Birds
Bringing birds to your backyard isn’t just for birdwatchers—it’s a delightful way to connect with nature, teach kids about the environment, and beautify your outdoor space. These Birdseed Ornaments are not only a simple and fun DIY craft, but they’re also an eco-friendly way to support local bird populations. Crafted with natural ingredients and shaped using festive cookie cutters, these hanging seed feeders attract feathered friends and bring your trees to life with color, movement, and birdsong. Whether you’re preparing for spring or just want to liven up your garden, this is a meaningful and rewarding craft for all ages.
Table of Contents
Ingredients
To make approximately 8 birdseed ornaments, gather the following:
- 3 cups wild birdseed mix
- 2 packets (½ oz total) unflavored gelatin
- ½ cup boiling water
- 2 tablespoons light corn syrup (optional, for extra stickiness)
- Non-stick cooking spray
- Assorted metal cookie cutters (hearts, stars, trees, etc.)
- Drinking straws, cut into 2-inch pieces
- Twine or ribbon for hanging
Instructions
Step 1: Prepare the Binding Mixture
In a heatproof mixing bowl, whisk the unflavored gelatin into ½ cup of boiling water. Stir until the gelatin is completely dissolved and smooth. If desired, stir in 2 tablespoons of light corn syrup for added stickiness, which can help the ornaments hold their shape better in fluctuating weather.
Step 2: Add the Birdseed
Fold in the wild birdseed mix, stirring until every seed is fully coated with the gelatin solution. If the mixture feels too wet or soupy, sprinkle in a bit more birdseed until you reach a thick, moldable consistency. You want the seed mixture to be dense and sticky.
Step 3: Shape the Ornaments
Spray the inside of your chosen metal cookie cutters and a parchment-lined baking tray with non-stick cooking spray. Place the cookie cutters on the tray and pack the birdseed mixture firmly into each one. Press down using a spoon or your fingers to ensure the mixture is compacted and holds its shape.
Step 4: Make Holes for Hanging
Insert a 2-inch straw segment into the top part of each shape. Push gently but deeply enough to create a clear hole through the ornament. This is where you’ll thread the twine or ribbon later.
Step 5: Chill Until Firm
Transfer the entire tray to the refrigerator and let the ornaments chill for 2–3 hours, or ideally overnight. This gives the gelatin mixture time to solidify fully and ensures the shapes won’t crumble when removed.
Step 6: Remove and Hang
Once firm, carefully pop the ornaments out of the cookie cutters. Remove the straw pieces to reveal clean holes for hanging. Thread twine or ribbon through each hole, tie a secure knot, and your ornaments are ready to hang outdoors.
Step 7: Display Outdoors
Hang the ornaments from sturdy tree branches, fences, or garden hooks. Choose shady spots that are away from midday sun and far from predators such as cats. Watch as local birds enjoy their new treat.
Benefits of This Craft
Making birdseed ornaments is more than just an afternoon project—it’s a wonderful way to engage with nature and promote environmental stewardship. These ornaments provide supplemental food to local birds, especially during seasons when natural sources may be limited. Crafting with children helps teach them about wildlife, ecosystems, and sustainability. Unlike plastic bird feeders, these natural ornaments biodegrade over time and don’t produce long-term waste. Plus, the act of making and gifting these homemade treats is deeply satisfying, offering a hands-on alternative to screen time and a tangible connection to the outdoors.
Tips
Choose wild birdseed blends that suit the birds native to your region. Black oil sunflower seeds, millet, and cracked corn are often favorites for many backyard birds. When choosing cookie cutters, go for metal ones—they hold their shape better than plastic when filled with dense seed mixtures. Press the mixture down firmly into each mold to avoid breakage when unmolding. If you’re in a particularly warm climate, reduce the corn syrup to make the ornaments firmer. You can store extra ornaments in the fridge for a week before hanging or giving them as gifts.
What Taste Look Like
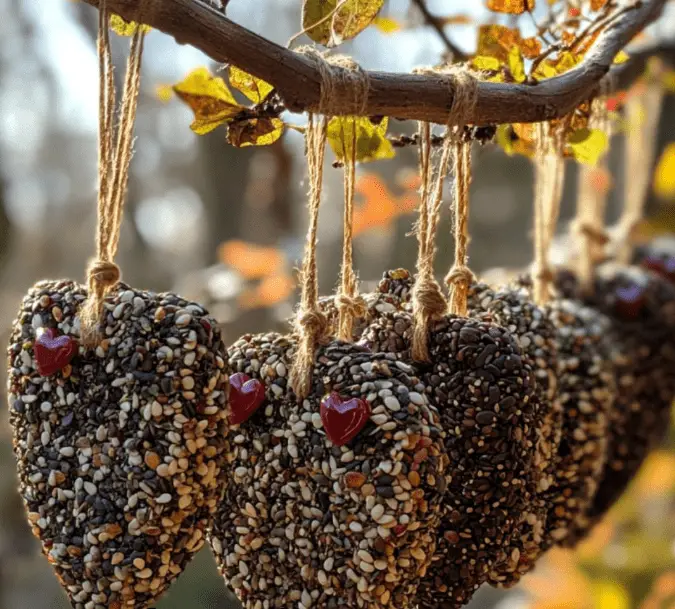
These birdseed ornaments are not designed for human consumption, but they offer a visual charm that fits beautifully with any garden or backyard setting. The colorful variety of seeds pressed into fun shapes like hearts, stars, and trees make them look almost like holiday cookies. Once hung, they gently sway in the breeze, catching the light and drawing in local birds with their familiar ingredients. They become a visual feast for both the birds and the humans watching from nearby windows or porches.
How to Store
Before hanging, you can store birdseed ornaments in an airtight container in the refrigerator for up to one week. If you’re making them in bulk as gifts, keep them cool and dry, and package them in wax paper or parchment inside small paper bags. Avoid storing them in humid or warm environments, as the gelatin can soften or mold. Once hung outdoors, the ornaments will typically last several days to a week, depending on the weather and how quickly they’re eaten. If rain is expected, take them down temporarily or place them in a sheltered spot.
These Birdseed Ornaments offer a wonderful way to add beauty and purpose to your outdoor space while supporting the local bird population. Whether you’re crafting them as part of a spring activity with your kids, creating thoughtful eco-friendly gifts, or simply looking to brighten your backyard, this project is easy, affordable, and impactful. With just a few household ingredients and a touch of creativity, you can turn a morning of crafting into weeks of birdwatching and nature appreciation.
For More DIY craft ideas, visit More DIY craft ideas
FAQ
Are these ornaments safe for all birds?
Yes, as long as you use a birdseed blend designed for wild birds and avoid artificial additives or dyed decorations.
Can I skip the corn syrup?
Yes, the corn syrup is optional and mostly helps with stickiness. If you leave it out, be sure to press the mixture extra firmly.
What if the ornaments fall apart when removing them?
That usually means they didn’t chill long enough or the mixture was too wet. Try refrigerating longer and packing the mixture more tightly next time.
Can I use these during winter?
Absolutely. These treats are excellent during colder months when natural food sources are scarce.
What’s the best place to hang them?
Choose shaded tree branches or fence posts that are visible from your window but safe from cats or other predators.