Colored Salt Jars: A Fun and Easy DIY Craft to Brighten Any Space
If you’re looking for a creative, affordable, and visually stunning craft project, Colored Salt Jars are a perfect choice. With just a few simple materials—most of which you probably already have at home—you can make vibrant, layered jars that serve as colorful decorations, party favors, or thoughtful handmade gifts. This DIY activity is especially fun for kids and adults alike, allowing room for creativity and hands-on fun. Whether you want to enhance a windowsill, add charm to a desk, or give a personal touch to a gift basket, these colorful jars offer a unique and budget-friendly solution.
Table of Contents
Ingredients
To make your own colored salt jars, gather the following materials:
- Small jars with cork lids or recycled glass jars
- Salt (table salt works best)
- Food coloring (liquid or gel)
- Sandwich bags
- Funnel
- Spoon
- Hot glue gun
Instructions
Step 1: Color the Salt
Start by pouring some salt into a sandwich bag. Add a few drops of food coloring—either liquid or gel. If you’re using gel coloring, sprinkle salt over the gel before sealing the bag to prevent it from sticking. Seal the bag tightly, then shake it well until all the salt is evenly coated with the desired color.
Step 2: Blend for Even Color
If the salt isn’t fully colored or you’re using gel food coloring, gently pinch and rub the salt within the sealed bag to help distribute the color evenly. Continue rubbing until the mixture reaches your desired shade. You can adjust the vibrancy by adding more food coloring as needed.
Step 3: Layer the Salt in the Jar
Once your colored salt is dry and ready, it’s time to fill your jar. Use a spoon and funnel to carefully layer different colors of salt into the jar. For creative effects, tilt the jar slightly while pouring to create slanted stripes or waves.
Step 4: Fill the Jar Completely
Pack the jar with more salt than you think you’ll need. When you insert the cork or lid, it will press down on the salt and may compress the layers. Tightly packing the jar prevents colors from mixing and helps preserve your design.
Step 5: Seal the Jar
Use a hot glue gun to seal the cork lid in place. This keeps the layers intact and prevents the salt from spilling or shifting. Allow the glue to dry completely before moving or gifting the jar.
Now you have a stunning colored salt jar that’s ready to display or give as a heartfelt homemade gift.
Benefits of This Craft
Making colored salt jars offers a wide range of benefits, both creatively and practically. This hands-on activity encourages artistic expression, making it ideal for children, teens, or anyone looking for a calming, screen-free project. It’s an excellent introduction to color theory, allowing crafters to experiment with mixing and layering hues. From a sustainability perspective, this project also encourages the reuse of glass jars, giving new life to containers that would otherwise be discarded. And best of all, it produces a visually beautiful end result—making it a wonderful way to personalize a space or offer a handmade gift from the heart.
Tips
If you’re using gel food coloring, add only a small amount at first. It’s highly concentrated and can overpower the salt’s natural brightness. Always let the colored salt dry completely before layering to avoid moisture clumping inside the jar. You can leave the salt open to air dry for about 30 minutes or use a low-temperature oven to speed up the process. If you want a more defined pattern, use a small stick or skewer to push salt layers into specific shapes. For added sparkle, mix in a little glitter with your colored salt—but only if the jars are for display, not play.
What Taste Look Like
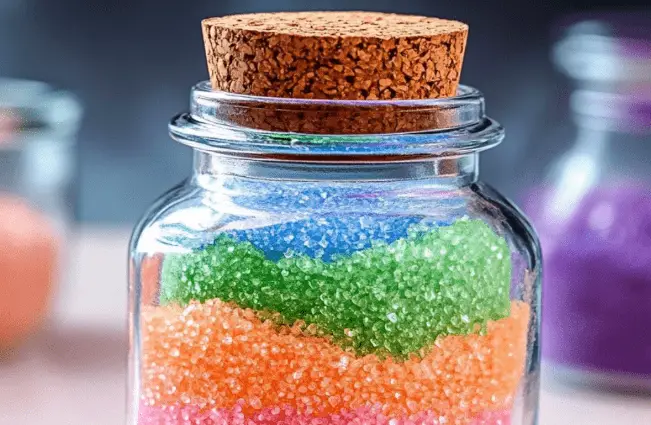
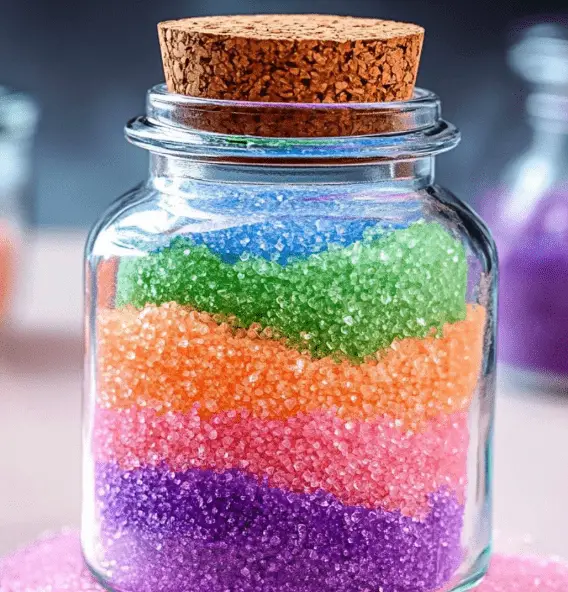
Although these jars are not edible, their appearance is striking and playful. Think of the vivid colors of a sand art bottle, combined with the fine texture of salt and soft blending of shades from layer to layer. You can create a gentle pastel palette for a subtle, elegant look, or go bold with rainbow brights and neon tones. The result is a jar filled with neatly stacked, vibrantly colored layers that resemble tiny geological formations. From afar, it may even resemble a jar of colored sugar, making it a tempting and eye-catching decoration.
How to Store
Colored salt jars are designed for long-term display and require very little maintenance. Store them in a dry place away from direct sunlight to preserve the intensity of the colors. Moisture can cause the salt to clump or fade over time, so ensure the jar is sealed tightly with the cork and that the glue holds firmly. If gifting, wrap the jar in bubble wrap or tissue paper and place it inside a sturdy box to protect the layers during transport. Avoid shaking or dropping the jar, as that can mix the carefully arranged colors.
Colored Salt Jars are one of those rare crafts that are easy to make, beautiful to display, and fun for all ages. Whether you’re making them as a rainy-day project, birthday party activity, or seasonal home décor, these layered jars deliver vibrant charm with minimal cost and effort. They make perfect gifts for teachers, friends, or loved ones, and can be customized to match holidays, personal color schemes, or themed events. With just salt, coloring, and a little creativity, you can create something truly special.
For More DIY craft ideas, visit More DIY craft ideas
FAQ
Can I use any type of salt?
Yes, but fine table salt works best for smooth layering and even color distribution. Coarse salt may result in clumping and uneven patterns.
How long do colored salt jars last?
If sealed properly and kept in a dry environment, they can last indefinitely. Keep away from moisture and sunlight to preserve vibrancy.
Can kids do this craft on their own?
Yes, with supervision. Adults should handle the hot glue gun, but coloring and layering the salt are safe and fun for children.
Can I make themed jars (e.g., holidays, birthdays)?
Absolutely. Use color combinations to match themes like red and green for Christmas, or pastel shades for baby showers.
What if my salt is clumping?
This usually means it wasn’t dry before layering. Let colored salt dry on parchment paper before assembling your jar.