How to Create Stunning Borax Crystal Flowers: A Fun DIY Project
Creating your own crystal flowers is a magical way to add an elegant and enchanting touch to any room. These Borax crystal flowers sparkle in the light, making them an excellent addition to your home decor. Whether you’re planning to use them for a special event, or simply to add some colorful beauty to your everyday surroundings, this DIY project is both simple and rewarding. It’s the perfect craft for all ages and skill levels, making it an ideal activity for families, kids, or even solo crafting enthusiasts.
In this guide, we will walk you through the steps to create your own dazzling crystal flowers, using Borax, fake flowers, and a few household items. Get ready to dive into a fun, creative project that yields beautiful, sparkling results.
Table of Contents
Ingredients
To begin crafting your crystal flowers, you’ll need the following materials:
- Borax
- Water
- Fake flowers (preferably those with soft petals that will easily soak up the crystals)
- Pencils
- String
- Tape
- Spoons
- Containers (for holding the solution)
- Paper Towels
These ingredients are easy to find and relatively inexpensive, making this project both fun and budget-friendly.
Instructions
Here’s a step-by-step guide to help you create your stunning Borax crystal flowers:
- Prepare the Flowers: Begin by carefully removing all the leaves from your fake flowers. For the best results, you want to focus purely on the petals and stems. This will ensure the crystals form evenly on the flower without any interference from the leaves.
- Set Up the Hanging Mechanism: Take your pencils and tie the flower stems to them using string. The goal is to create a hanging floral masterpiece where the flowers dangle beautifully into the containers. Make sure each flower is suspended with its petals floating freely in the solution without touching the sides or bottom of the container.
- Adjust the String: If necessary, adjust the string lengths so that the flowers are hanging properly, floating freely inside the containers. This will ensure that the crystals grow evenly and without obstruction.
- Prepare the Solution: Bring water to a boil in a pot or kettle. Once the water is boiling, carefully pour it into the containers. The amount of water will depend on how many flowers you’re making, but make sure there’s enough to fully submerge the flowers.
- Create the Super-Saturated Solution: Gradually add spoonfuls of Borax to the boiling water, one by one, stirring well after each addition. You want to create a super-saturated solution, meaning that the water should be as full of dissolved Borax as it can hold. Keep adding and stirring until no more Borax will dissolve, indicating that the solution is fully saturated.
- Place the Flowers into the Solution: Carefully lower the flowers into the containers, ensuring they are completely submerged in the solution. Leave the flowers to soak for about 2 hours, giving the Borax crystals time to form on the petals and stems.
- Remove and Admire the Crystals: After the soaking time has passed, carefully remove the flowers from the solution. The petals should now be covered in sparkling Borax crystals. Set them upright to dry on a paper towel. The crystals will continue to form and solidify as they dry.
- Clean Up the Crystals: If any Borax crystals are stubborn and stuck to the container, pour in some boiling water to dissolve them, making it easy to clean. The crystals should now be ready to be displayed!
And there you have it! Your very own sparkling Borax crystal flowers, ready to be admired.
Benefits of This Craft
Creating Borax crystal flowers is not just a fun and decorative activity—it’s also an educational and therapeutic craft. Here are some of the benefits of this DIY project:
- Stimulates Creativity: This craft allows you to play with colors and shapes, encouraging you to think creatively and come up with unique flower designs. It’s perfect for unleashing your inner artist.
- Educational Value: As you make the crystal flowers, you’ll learn about the process of crystallization. This is a great science experiment that can be done with kids or as a learning tool in the classroom.
- Relaxing and Therapeutic: The step-by-step process is calming and meditative, providing a great way to unwind while crafting something beautiful.
- Affordable and Accessible: With just a few simple ingredients, this craft is easy to do on a budget. Plus, you can use materials you likely already have around the house.
Tips
Here are some tips to help ensure your crystal flowers turn out perfectly:
- Use Brightly Colored Flowers: The crystals will form better on petals with a bright color, as the contrast will make the crystals more visible.
- Make Sure the Flowers Are Fully Submerged: To ensure even crystal growth, make sure that each flower is fully submerged in the solution. If part of the flower is exposed, it might not form crystals in that area.
- Use a Clean Container: To prevent contamination and ensure the best results, make sure the container is clean before using it for the Borax solution.
- Don’t Rush: Allow the flowers to soak for the full two hours to ensure the crystals form completely. Rushing the process may result in less impressive results.
What Does It Look Like?
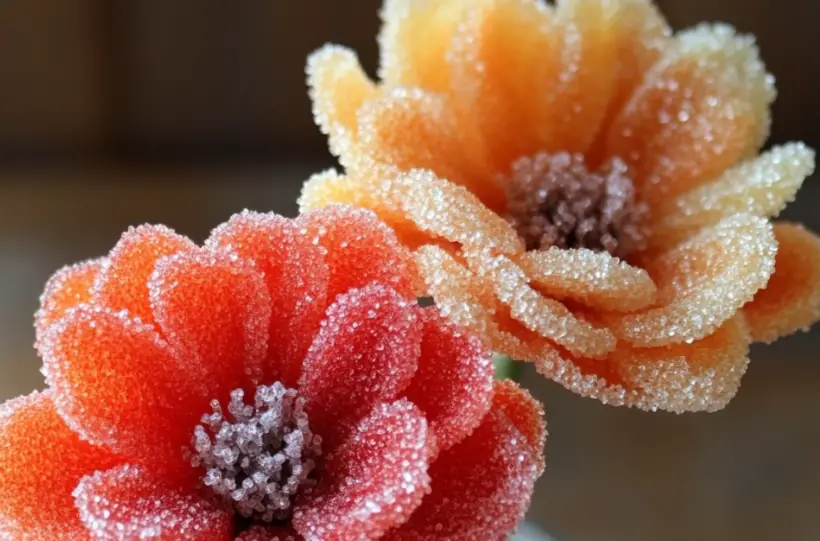
Once your Borax crystal flowers are complete, you’ll be treated to a dazzling display of sparkling, colorful crystals. The petals will be covered in tiny, glimmering crystals, giving them a frosty, ice-like appearance. These crystals reflect light beautifully, making the flowers appear to shine and sparkle, especially when placed near a window or in direct light. The overall effect is magical, turning the simple fake flowers into something extraordinary and enchanting.
How to Store
To preserve your crystal flowers, it’s best to display them in a dry area, away from moisture. The crystals can dissolve if exposed to high humidity or direct contact with water. Keep your flowers on a shelf or table where they won’t be disturbed by cleaning or movement. You can also store them in a display box or container to keep them safe and dust-free.
If you ever need to clean them, simply wipe gently with a dry cloth to remove any dust or debris. Avoid washing them with water, as it may cause the crystals to dissolve or lose their sparkle.

Creating Borax crystal flowers is a fun, easy, and rewarding DIY project that allows you to bring a touch of magic to your home decor. With just a few simple ingredients, you can transform fake flowers into sparkling, crystal-covered masterpieces that are sure to wow anyone who sees them. This craft is not only perfect for sprucing up your space, but it also provides an opportunity to learn about the science of crystallization and exercise your creative muscles.
If you’re looking for more fun DIY craft ideas and inspiration, be sure to visit More DIY craft ideas for additional projects that you can tackle at home.
FAQ
Q: Can I use real flowers instead of fake ones?
A: While fake flowers are ideal for this project, real flowers will also work. However, they may not hold up as well in the solution and may wilt or decompose more quickly.
Q: How long do the Borax crystals last?
A: The crystals should last indefinitely as long as they are stored properly in a dry environment.
Q: Can I use a different type of Borax solution for larger flowers?
A: Yes, you can adjust the amount of Borax and water to create a larger or more concentrated solution. Just make sure the flowers are fully submerged.
Q: What happens if I leave the flowers in the solution too long?
A: Leaving the flowers in the solution for too long can cause the crystals to grow excessively and potentially damage the flowers. Stick to the recommended two-hour soak time for the best results.

