Fizzing Hands Science Experiment: A Colorful, Educational DIY Project for Kids
Looking for an exciting and educational activity that will capture attention, spark laughter, and sneak in a little science? The Fizzing Hands Science Experiment is a perfect blend of chemistry and creativity. Designed to simulate an eruptive reaction right from the fingertips of a rubber glove, this fun DIY craft introduces basic chemical reactions while delivering an impressive visual show. It’s a wonderful hands-on project for kids, classrooms, or even themed parties.
This project turns common household items into a magical bubbling eruption that mimics fizzing fingers. Safe (with supervision), easy to assemble, and endlessly entertaining, the Fizzing Hands experiment will quickly become a favorite among curious minds. Let’s explore how it works, the materials you’ll need, and some added tips for making it even more unforgettable.
Table of Contents
Ingredients
To perform the Fizzing Hands experiment, gather the following supplies:
- Wide-mouth jar
- 3 tablespoons ARM & HAMMER baking soda
- 1 cup vinegar
- Liquid dish soap
- Food coloring
- Paper clip
- Rubber bands
- Safety glasses or goggles
These materials are commonly found at home or easily sourced from a grocery or craft store. Always supervise children when performing this activity, especially when handling tools like paper clips or substances like vinegar.
Instructions
Step 1: Prepare the Base Mixture
Place your wide-mouth jar on a baking tray to catch the overflow from the bubbling reaction. Pour in 1 cup of vinegar, add a generous squeeze of liquid dish soap, and then stir in a few drops of food coloring of your choice. Stir the mixture lightly and set the jar aside.
Step 2: Prep the Glove
For this step, adult supervision is necessary. Using a paper clip, carefully poke a small hole in each fingertip of the rubber glove. This allows the bubbling foam to escape in a dramatic, finger-like eruption.
Step 3: Fill the Glove with Baking Soda
Pour 3 tablespoons of ARM & HAMMER baking soda into the glove. Give the glove a gentle shake to distribute the baking soda into each fingertip. This ensures a uniform fizz once the reaction begins.
Step 4: Seal the Glove to the Jar
Carefully stretch the open end of the glove over the mouth of the jar. Avoid tipping any of the baking soda into the liquid mixture below. Secure the glove with rubber bands to make sure it’s tightly fastened.
Step 5: Head Outside
Move your tray and jar outside or to a well-covered surface for easier cleanup. The reaction can get messy, and it’s more fun when there’s room to enjoy the eruption without worrying about splashes.
Step 6: Release the Reaction
Gently lift the glove to allow the baking soda to fall into the vinegar mixture inside the jar. Almost instantly, you’ll witness a colorful, foamy eruption shooting from the glove’s fingertips. It’s science with a splash of silly fun.
Benefits of This Craft
The Fizzing Hands experiment is not only fun—it also offers several educational and developmental benefits for children:
- Science Education: This project introduces children to the concept of acid-base reactions using safe, household materials.
- Hands-On Learning: Encourages active participation, which helps with memory retention and curiosity-driven exploration.
- Creativity and Customization: Kids can experiment with different colors and glove shapes for endless variations.
- Sensory Stimulation: The sound, movement, and texture of the fizzing foam provide sensory engagement for younger children.
- Teamwork and Sharing: Great for classrooms or group settings where children can work together and discuss results.
- Encourages Outdoor Play: Because of the mess potential, this is a perfect activity to take outside on sunny days.
Tips
To make your Fizzing Hands experiment even better, here are some expert tips:
- Use a Deep Tray: This helps contain the overflow and makes cleanup faster.
- Double Glove for Strength: Rubber gloves can tear under pressure; doubling up adds durability.
- Try Different Colors: Using multiple jars with different food coloring creates a rainbow eruption effect.
- Warm Vinegar: Slightly warming the vinegar before adding it can intensify the bubbling reaction.
- Let Kids Guess: Turn it into a game by asking kids what they think will happen before the reaction starts. It builds anticipation and scientific thinking.
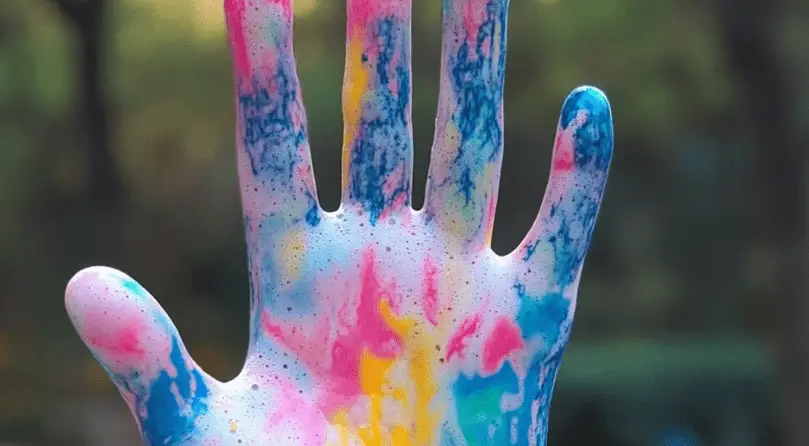
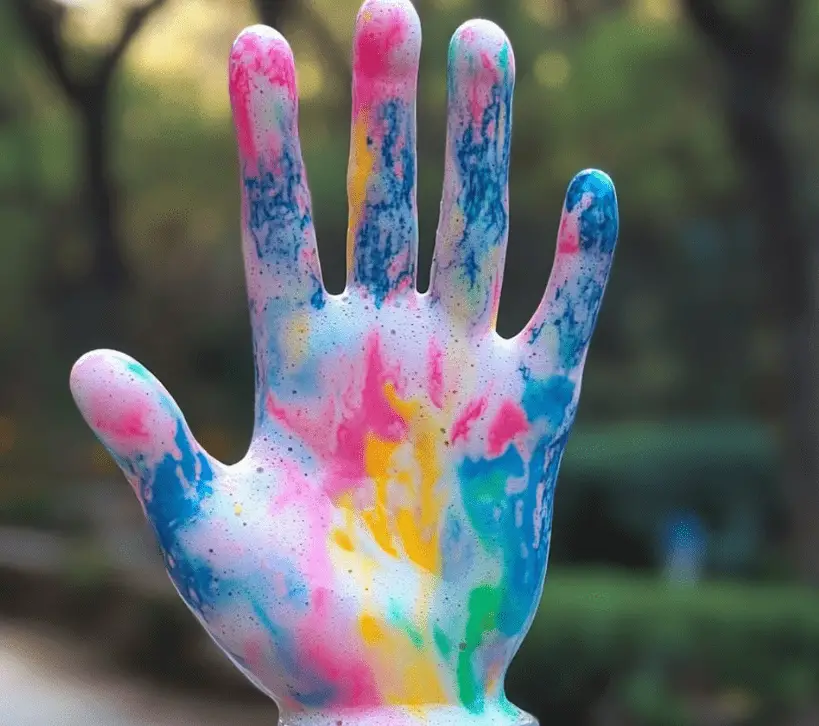
What Does It Look Like?
The visual effect of the Fizzing Hands experiment is what makes it such a show-stopper. As soon as the baking soda hits the vinegar, a fizzy eruption of colored foam begins rising quickly through the fingertips of the glove. It looks like a hand spewing colorful lava, turning an ordinary science lesson into a live-action volcano demonstration. The texture of the foam is thick and bubbly, often drawing lots of giggles and “oohs” from the audience.
How to Store
While this craft is designed to be performed once, you can prepare elements in advance for classroom use or multiple demos:
- Pre-Fill Gloves: Fill gloves with baking soda and store them in a sealed plastic bag until ready to use.
- Prepare Vinegar Mix Separately: You can mix vinegar, soap, and coloring in advance and store it in jars with lids.
- Clean-Up Prep: Have towels and rinse water ready nearby if working indoors. Outdoors, just rinse the area after the reaction.
This craft is not designed for long-term storage after completion, but it is easy to reset and repeat whenever desired.
The Fizzing Hands science experiment is the perfect DIY activity to combine laughter, learning, and sensory fun. Whether you’re introducing a science concept to young learners or just looking for a creative way to spend an afternoon, this engaging eruption craft checks every box. With simple supplies and easy steps, it turns your home or classroom into a miniature science lab of joy.
If you enjoyed this activity and are looking for more creative ideas, be sure to check out More DIY craft ideas on our blog. From fizzy experiments to calming sensory crafts, there’s something for everyone to try.
Need visual inspiration or want to share your own Fizzing Hands setup? Head to Pinterest and search for “Fizzing Hands Science Experiment” to find creative variations and pin your favorites.
FAQ
Is this experiment safe for all ages?
Yes, with proper adult supervision. Always assist children with the glove prep and ensure safety glasses are worn to protect eyes from any splashes.
Can I use other types of gloves?
Yes, but rubber gloves tend to work best due to their strength and flexibility. Thin latex gloves may tear more easily.
What does the dish soap do?
Dish soap traps the carbon dioxide gas in bubbles, creating a foamy texture instead of just fizz.
Can I reuse the materials?
The gloves and reaction mixture are single-use, but the jar and tray can be rinsed and reused.
How does the reaction work?
It’s a classic acid-base reaction. Baking soda (a base) reacts with vinegar (an acid), releasing carbon dioxide gas. The soap traps the gas to form foam.