Crystal Name Science Experiment: A Fun and Educational Craft for Kids
If you’re looking for a fun and educational activity that blends creativity, science, and a bit of magic, the Crystal Name Science Experiment is the perfect project! Not only will kids love watching their names transform into sparkling crystals, but they will also learn about the fascinating science behind crystal formation. This DIY experiment combines hands-on creativity with a scientific explanation that is sure to captivate young minds.
Table of Contents
Ingredients for the Crystal Name Science Experiment
To get started with the Crystal Name Science Experiment, you’ll need the following simple materials:
- Pipe cleaners
- Fishing line
- Pencils or wooden skewers
- Scissors
- Clear plastic or glass containers
- Borax
- Food coloring
- Measuring cup
- Tablespoon
- Heat-safe mixing bowl
These ingredients are easily available and can often be found at home or in any local craft store. Most of the materials are safe for kids to use, with the primary caution being the hot water involved in the process.
Instructions for the Crystal Name Science Experiment
Follow these simple instructions to create your very own sparkling crystal names:
- Shape the Names:
Begin by bending pipe cleaners into the shape of each letter in the name you want to crystallize. Be creative—try different names, initials, or even fun words. Once the letters are shaped, tie a piece of fishing line to each letter, making sure the line is long enough to suspend the letters in the container without touching the sides or bottom. - Prepare the Crystal Solution:
Heat water in a heat-safe bowl until it’s hot but not boiling. For every cup of hot water, mix in 3 tablespoons of borax. Stir the mixture well until the borax is completely dissolved. For added fun, you can add food coloring to the solution, creating a colorful crystal effect when the crystals form. - Grow the Crystals:
Carefully pour the borax solution into the clear containers, making sure there is enough to submerge the pipe cleaner letters. Then, lower the pipe cleaner letters into the solution, ensuring they don’t touch the sides or bottom of the container. Let the containers sit undisturbed overnight. By the next day, you’ll see beautiful crystals forming on the pipe cleaners, creating an amazing effect!
Benefits of This Craft
The Crystal Name Science Experiment offers more than just a fun way to pass the time. It comes with multiple benefits that make it a perfect activity for children and even adults:
- Educational Value: This experiment introduces children to the concept of crystal growth and supersaturation, providing them with a real-life example of how crystals form. The scientific process behind this activity can spark a love for chemistry and hands-on learning.
- Creativity: Shaping the pipe cleaners into letters allows children to express their creativity by customizing their names or making unique words. Adding food coloring creates an artistic, vibrant twist on a scientific experiment.
- Hands-On Learning: This craft encourages kids to engage in a hands-on activity, enhancing their fine motor skills and problem-solving abilities. The process of shaping the pipe cleaners and observing the changes in the solution helps develop patience and curiosity.
- Fun for All Ages: This experiment is not only great for children but also for adults, educators, or anyone interested in exploring the wonders of science. It’s an activity that fosters bonding and learning in a fun, interactive way.
Tips for Success
While this experiment is relatively straightforward, there are a few tips to ensure you achieve the best results:
- Use Clear Containers: For the full effect, make sure to use clear plastic or glass containers. This will allow you to see the crystal growth from all angles.
- Let the Solution Cool: Be patient with the hot water. Allow the water to cool slightly before mixing in the borax to avoid burns or accidents, especially when children are involved.
- Add Extra Borax: If you want to increase the number of crystals, you can always add a little more borax to the solution. Just be careful not to make it too concentrated, as the crystals may form too quickly and unevenly.
- Don’t Disturb the Solution: Once the pipe cleaners are submerged, avoid moving the containers to prevent the crystals from forming unevenly. The solution needs to be undisturbed to allow for consistent growth.
- Use Different Colors: Food coloring can make the experiment even more exciting. Experiment with different colors to see how they affect the look of the crystals. You can also mix colors for a multi-colored crystal effect.
What Do the Crystals Look Like?
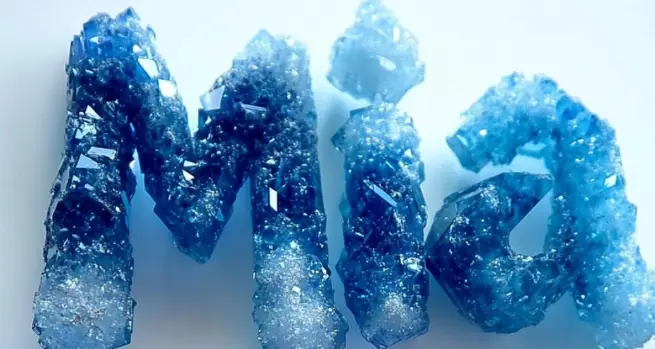
The crystals that form on the pipe cleaners are beautiful and intricate. As the borax settles and clings to the pipe cleaners, it forms a sparkling, crystalline coating that grows over time. Depending on the food coloring you use, the crystals can appear in a wide range of vibrant hues—adding a colorful touch to the experiment.
The crystals will resemble tiny, shimmering ice-like structures, and each name will have its own unique pattern. These crystals form in a way that is similar to snowflakes, with each one being slightly different, giving them a magical and natural appearance.
How to Store Your Crystal Name Craft
Once the crystals have fully formed, you’ll want to store them properly to preserve their beauty:
- Keep them in a Dry, Cool Place: To avoid damage to the crystals, store them in a dry, cool area. Avoid direct sunlight, as this could cause them to fade or weaken over time.
- Display Them Creatively: Consider displaying the crystal names in a clear jar, hanging them from a string, or placing them on a shelf for a decorative touch. These can also make beautiful and unique gifts for friends and family.
- Handle with Care: The crystals can be delicate, so be careful when moving or touching them. They might break or lose their form if mishandled, especially if they are large.
Conclusion
The Crystal Name Science Experiment is a fantastic way to combine learning and fun. This craft not only gives kids the opportunity to create beautiful crystal names but also introduces them to fundamental scientific concepts in an engaging and hands-on manner. Whether it’s for a rainy day activity, a science fair project, or just an afternoon of fun, this craft will captivate anyone who tries it. Plus, the glowing crystals are a stunning result of both creativity and science coming together!
For more exciting DIY craft ideas, be sure to check out More DIY craft ideas to keep the fun and learning going!
FAQ
Can I use other types of crystals besides borax?
Yes, you can experiment with other types of crystals such as Epsom salt, sugar, or alum, but borax is one of the best options for visible and durable crystal growth.
How long do the crystals take to form?
The crystals will start to form within hours, but it’s best to leave them overnight for the most impressive results.
Can I use a larger container for bigger names?
Absolutely! You can use a larger container as long as it’s big enough to allow the letters to dangle freely in the solution without touching the sides or bottom.
Can I reuse the borax solution?
You can store the solution in a safe container for later use, but over time it may lose its effectiveness. It’s recommended to make a fresh batch for future experiments.
Is this safe for young children?
Yes, but the water should not be boiling, and it’s essential to handle the hot water with caution. Always supervise young children during the activity.