Hydro Dipped Ornaments: A Vibrant DIY Craft to Brighten Your Holiday Decor
Looking for a simple, eye-catching craft that transforms plain ornaments into stunning art pieces? Hydro dipped ornaments are the perfect way to blend creativity with color and make your holiday decorations pop. Whether you’re crafting with family, prepping for a festive gathering, or simply looking for a new hobby, this project is an easy and fun way to personalize your decor.
Table of Contents
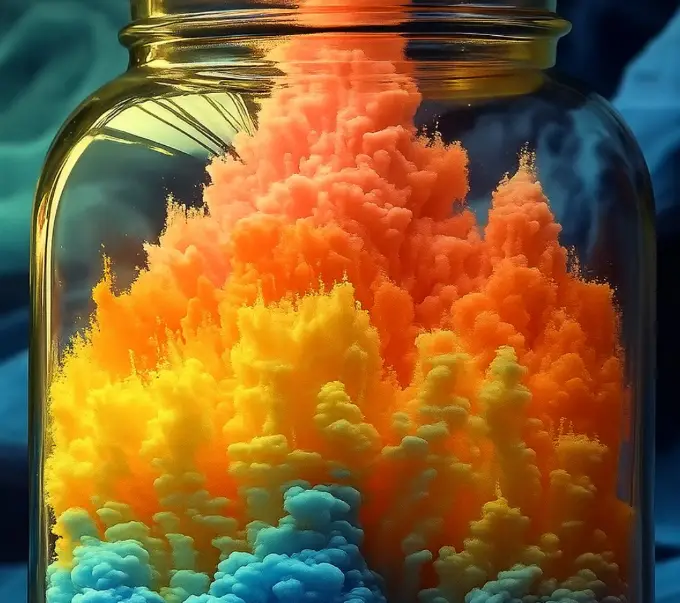
These mesmerizing ornaments involve dipping clear glass or plastic balls into a mixture of swirling acrylic paint and water, creating one-of-a-kind patterns every time. The best part? No two ornaments will ever look the same, making each piece truly unique.
Let’s dive into how you can make your own hydro dipped ornaments right at home.
Ingredients You’ll Need
To get started, gather the following supplies:
- Clear glass or plastic ornaments
- Acrylic paint in various colors
- Disposable container large enough to dip ornaments
- Toothpicks or skewers for swirling paint
- Paper towels
- String or hooks for hanging the ornaments
Instructions
- Start by carefully removing the tops of your ornaments—this is where the magic begins!
- Grab your disposable container and fill it with water; think of this as your vibrant dipping station.
- Time to unleash some color! Add your favorite acrylic paint to the water and give it a little swirl.
- Use a toothpick or skewer to mix the paint gently, crafting beautiful patterns that will soon adorn your ornaments.
- Dip your ornament into the water, twisting it softly to let the paint hug every curve and contour.
- Carefully lift the ornament out and place it on paper towels, letting it dry completely.
- Once your masterpiece is dry, reassemble the tops onto your ornaments.
- Add string or hooks so you can hang your creations with pride!
- Find the perfect spot to showcase your fabulous decorations—they’re bound to be the highlight of the season!
Benefits of This Craft
Hydro dipped ornaments offer more than just beauty—they’re an experience. This hands-on activity is excellent for both kids and adults, making it ideal for family bonding during the holiday season. It helps develop fine motor skills, encourages artistic expression, and provides a satisfying sense of accomplishment when the ornaments are finally hung.
Additionally, this project is budget-friendly. Most of the supplies can be found at home or picked up from any craft store for a reasonable price. If you’re looking for an eco-conscious activity, you can even reuse old ornaments and give them a completely new look.
Tips for Best Results
- Use room temperature water. Cold water can cause the paint to sink, while hot water can dry it too quickly.
- Work quickly. Acrylic paint can start drying on the water surface if left too long, so dip soon after swirling.
- Experiment with colors. Try different color combos and layering techniques to see what effects you can create. Metallic paints often give an extra festive touch.
- Wear gloves. This helps keep your hands clean and avoids fingerprints on the ornaments.
- Practice first. Use a spare ornament or a plastic lid to test your technique and paint combinations.
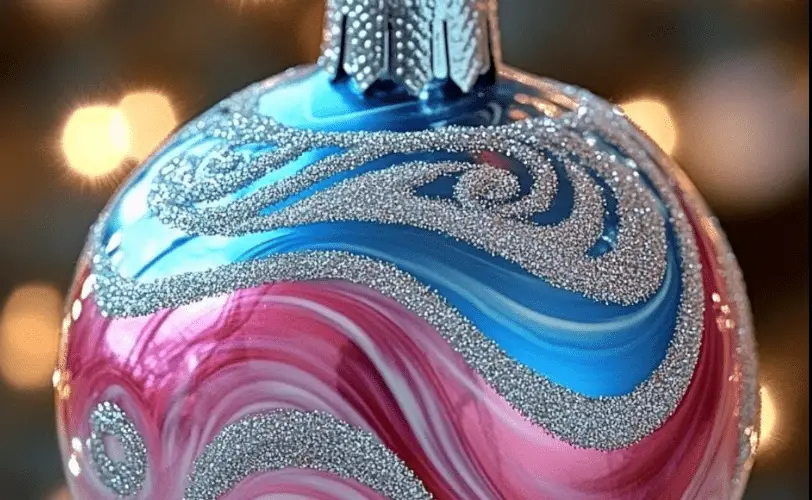
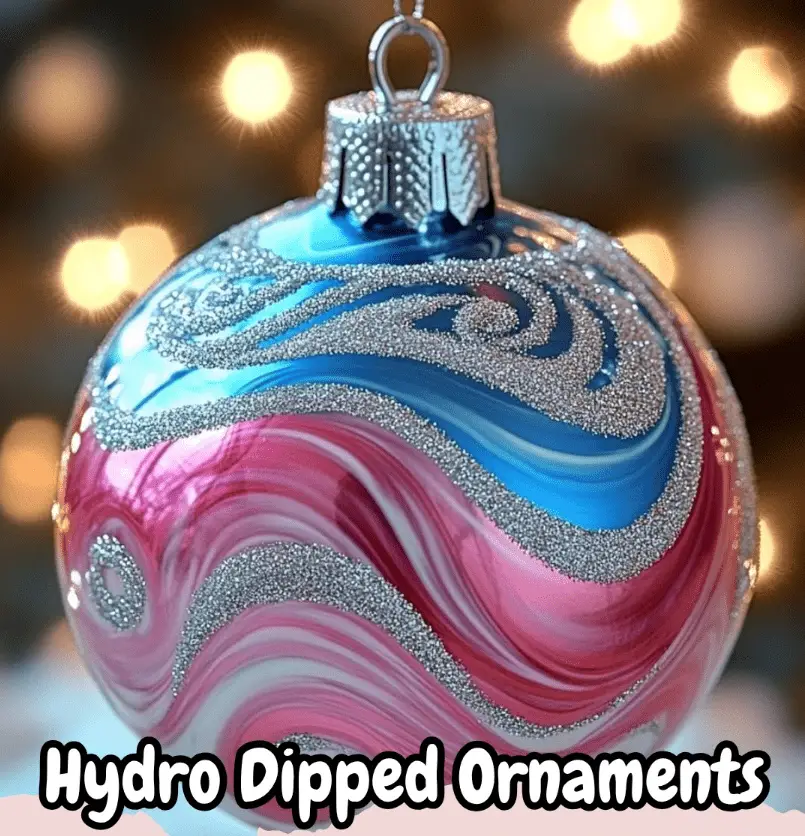
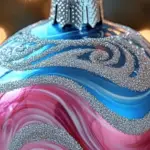
What Do Hydro Dipped Ornaments Look Like?
These ornaments are a visual treat. Each one showcases vibrant, fluid patterns that can resemble marble, tie-dye, or even abstract art. Depending on the color palette you choose, you can match any holiday theme—classic reds and greens, modern metallics, or frosty winter blues.
Their glossy finish reflects light beautifully on a tree, mantelpiece, or windowsill, giving your space an instant festive upgrade.
How to Store Your Ornaments
Once the holidays are over, you’ll want to preserve your ornaments for years to come. Here are a few storage tips:
- Allow ornaments to cure for at least 48 hours before storing to ensure paint is fully dry.
- Wrap each ornament in tissue paper or bubble wrap to protect the painted surface.
- Store in a sturdy, compartmentalized box to prevent movement and breakage.
- Keep the box in a cool, dry place away from direct sunlight to maintain the vibrancy of the paint.
Hydro dipped ornaments are a simple yet magical way to elevate your holiday decor with personal flair. The craft is accessible, engaging, and results in something beautiful you’ll be proud to display. Whether you’re new to DIY or a seasoned maker, this project offers endless creative possibilities with minimal supplies.
If you’re inspired to explore even more seasonal crafts and decorations, be sure to check out More DIY craft ideas to keep the creative spark alive all year round.
And don’t forget to take a peek at Pinterest where you’ll find even more amazing hydro dipped ornament ideas to expand your technique and inspire new designs.
FAQ
Can I use nail polish instead of acrylic paint?
While nail polish is used in some hydro dipping crafts, it’s not ideal for ornaments. Acrylic paint offers better coverage and is less toxic for this purpose.
Do I need to seal the ornaments after dipping?
It’s optional. If you want added protection or shine, a clear acrylic sealer spray can be used after the paint dries.
Will this work on plastic ornaments as well as glass?
Yes, both plastic and glass ornaments work well. Just ensure they are clean and dry before dipping.
Can I use this technique on other items?
Absolutely. You can hydro dip vases, mugs, phone cases, and more—just ensure the surface is suitable for acrylic paint and water-based methods.
Is it okay to use the same water for multiple ornaments?
Yes, but be aware that paint residue builds up over time. Change the water when the colors become muddy or start drying too quickly.
Hydro Dipped Ornaments: A Vibrant DIY Craft to Brighten Your Holiday Decor
- Total Time: 30 minutes + drying time
- Yield: Varies by number of ornaments
Description
Transform plain clear ornaments into stunning marbled masterpieces using acrylic paint and water—an easy, festive DIY craft for all ages!
Ingredients
- Clear glass or plastic ornaments
- Acrylic paint (various colors)
- Disposable container (large enough for dipping)
- Toothpicks or skewers
- Paper towels
- String or ornament hooks
Instructions
- Remove the tops from your clear ornaments and set aside.
- Fill a disposable container with water to create your dipping station.
- Add acrylic paint in various colors to the surface of the water.
- Use a toothpick or skewer to swirl the paint into patterns.
- Dip an ornament into the paint, gently twisting to coat the surface.
- Lift the ornament out and place on paper towels to dry completely.
- Once dry, replace the ornament tops.
- Attach string or hooks and hang your beautiful creations!
Notes
Use warm water to help the paint float better. Try experimenting with color combinations for a unique look on each ornament.
- Prep Time: 10 minutes
- Cook Time: 0 minutes
- Category: Craft
- Method: Dipping
- Cuisine: N/A
Nutrition
- Serving Size: N/A
- Calories: 0
- Sugar: 0g
- Sodium: 0mg
- Fat: 0g
- Saturated Fat: 0g
- Unsaturated Fat: 0g
- Trans Fat: 0g
- Carbohydrates: 0g
- Fiber: 0g
- Protein: 0g
- Cholesterol: 0mg
Keywords: swirled ornaments, marbled paint craft, Christmas DIY, acrylic dip ornaments, festive decorations