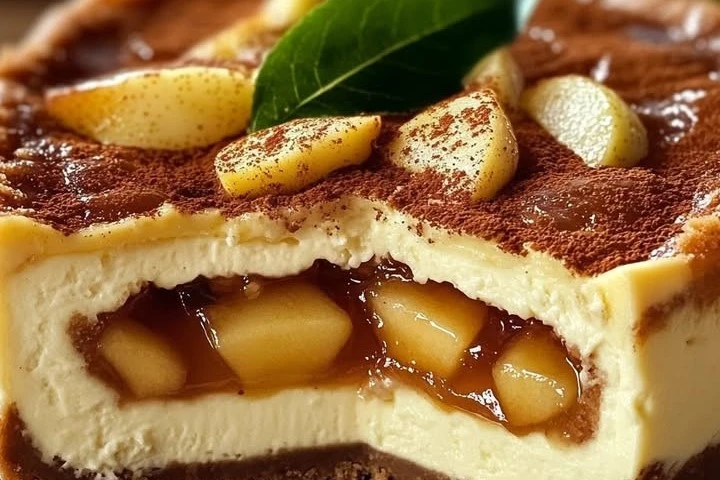
Apple Pie Stuffed Cheesecake: A Dreamy Dessert Mashup!
Apple Pie Stuffed Cheesecake: A Dreamy Dessert Mashup! : are you a dessert lover who finds it hard to choose between apple pie and cheesecake? Well, you’re not alone! These two classic desserts have won many hearts, and when combined, they create a heavenly treat that you won’t forget. Today, we are going to take a delightful journey into the world of dessert with an amazing recipe: Apple Pie Stuffed Cheesecake. This dessert is the perfect blend of creamy cheesecake and flavorful apple pie, making it a dream come true for anyone with a sweet tooth.

Why You Will Love This Recipe Apple Pie Stuffed Cheesecake: A Dreamy Dessert Mashup
This recipe for Apple Pie Stuffed Cheesecake is not just about mixing two desserts; it’s about creating an experience. The creamy cheesecake layer, with its smooth and rich texture, pairs beautifully with the warm, spiced apples encased in a flaky pie crust. It is a dessert that satisfies both the cheesecake lovers and apple pie fans alike!
Another great benefit of this recipe is that it allows you to showcase your baking skills in an impressive way. Whether it’s for a special occasion, a family gathering, or just a treat for yourself, this cheesecake will steal the show. Plus, you can adapt it to suit your taste, whether that means using store-bought ingredients or making it all from scratch.
So, roll up your sleeves and get ready to dive into this dreamy dessert mashup!
How to Prepare Apple Pie Stuffed Cheesecake
Let’s get started! Preparing this Apple Pie Stuffed Cheesecake requires a little time and effort, but don’t worry! By following these simple steps, you’ll create a stunning dessert that will impress everyone.
Ingredients:
Make sure to gather all your ingredients before you start. Here’s what you’ll need:
- For the Crust:
- 1 ½ cups graham cracker crumbs
- ½ cup sugar
- ½ cup melted butter
- For the Apple Pie Filling:
- 3 large apples (such as Granny Smith), peeled, cored, and sliced
- ½ cup brown sugar
- 1 teaspoon cinnamon
- ½ teaspoon nutmeg
- 1 tablespoon lemon juice
- 1 tablespoon cornstarch
- For the Cheesecake:
- 16 oz cream cheese, softened
- ½ cup sugar
- ½ cup sour cream
- 1 teaspoon vanilla extract
- 3 large eggs
Instructions:
Now that you have all your ingredients ready, let’s walk through the steps to make your Apple Pie Stuffed Cheesecake.
- Prepare the Crust:
- Preheat your oven to 325°F (163°C).
- In a mixing bowl, combine the graham cracker crumbs, sugar, and melted butter. Mix until the crumbs are evenly coated.
- Press the mixture into the bottom of a 9-inch springform pan to form an even layer. You can use a flat-bottomed glass to help press it down.
- Bake the crust for about 10 minutes, then remove it from the oven and let it cool.
- Make the Apple Pie Filling:
- In a large bowl, mix the sliced apples, brown sugar, cinnamon, nutmeg, lemon juice, and cornstarch. Toss everything together until the apples are well coated.
- In a saucepan over medium heat, cook the apple mixture for about 5-7 minutes until the apples start to soften. Remove from heat and let it cool.
- Prepare the Cheesecake Filling:
- In a large mixing bowl, beat the softened cream cheese with a hand mixer or stand mixer until smooth and creamy.
- Add the sugar, sour cream, and vanilla extract. Mix until everything is combined and smooth.
- Add the eggs, one at a time, mixing after each addition until fully incorporated.
- Assemble the Cheesecake:
- Pour half of the cheesecake filling over the cooled crust in the springform pan.
- Carefully add the apple pie filling on top, spreading it out evenly.
- Pour the remaining cheesecake filling over the apple layer, smoothing it out with a spatula.
- Bake the Cheesecake:
- Place the assembled cheesecake in the oven and bake for about 60-70 minutes. You want the edges to set while the middle remains slightly jiggly.
- Turn off the oven and leave the cheesecake inside for another hour to cool gradually. This helps prevent cracks.
- Cool and Chill:
- Once cooled, remove the cheesecake from the oven and let it cool to room temperature before transferring it to the refrigerator.
- Chill for at least 4 hours, but overnight is best to allow the flavors to meld.
How to Serve Apple Pie Stuffed Cheesecake
Serving your Apple Pie Stuffed Cheesecake is one of the best parts! When you’re ready to serve, carefully run a knife around the edges of the springform pan and remove the sides. You can slice it into wedges and serve it with a dollop of whipped cream or a scoop of vanilla ice cream on top.
For extra flair, drizzle some caramel sauce over each slice or sprinkle some cinnamon on top for that classic apple pie touch. This tasty cheesecake looks so good that it can stand alone, but a little garnish never hurts!
How to Store Apple Pie Stuffed Cheesecake
Storing your leftovers is easy! Keep the Apple Pie Stuffed Cheesecake in an airtight container in the refrigerator for up to 5 days. If you want to store it for a longer time, you can freeze it. Wrap individual slices tightly in plastic wrap, and then place them in a freezer-safe bag. They will stay good in the freezer for up to 2 months.
When you’re ready to eat frozen cheesecake, simply take it out and let it thaw in the refrigerator overnight.
Tips for Preparing Apple Pie Stuffed Cheesecake
- Soften Your Cream Cheese: Make sure your cream cheese is at room temperature to avoid lumps in your cheesecake batter. You can leave it out for about 1-2 hours before you start.
- Don’t Overmix: When mixing the eggs into the cheesecake batter, mix just until combined to prevent air bubbles, which can lead to cracks in your finished dessert.
- Use a Water Bath: For an extra creamy cheesecake, consider baking it in a water bath (bain-marie). Wrap the bottom of the springform pan in aluminum foil and place it in a larger baking dish filled with water while it bakes.
- Let It Cool Gradually: Allowing the cheesecake to cool inside the oven and then chill in the fridge helps prevent cracks and keeps the texture creamy.
- Be Creative: Feel free to add your spin on the recipe. You could use different types of apples, add nuts, or experiment with flavored extracts.
Variations
There are several variations of this Apple Pie Stuffed Cheesecake. Here are a few ideas to inspire you:
- Caramel Apple Cheesecake: Drizzle some caramel sauce on top of the apple filling before adding the cheesecake layer for an extra sweet touch.
- Nutty Crust: Instead of graham cracker crumbs, use crushed pecans or walnuts mixed with a bit of flour and sugar for a nutty crust.
- Spiced Up Cheesecake: Add a little pumpkin spice or additional cinnamon to cheesecake batter to give it a warm, spiced flavor.
Frequently Asked Questions
- Can I use store-bought apple pie filling?
Yes! Using store-bought apple pie filling can save you time. Just layer it in place of the fresh apple mixture. - Can I make this cheesecake ahead of time?
Absolutely! This cheesecake can be made a day or two in advance. Just make sure to store it properly in the refrigerator. - Why did my cheesecake crack?
Cracks can occur if the cheesecake is overmixed or baked at too high of a temperature. Allow it to cool slowly, and consider using a water bath for next time. - How can I tell when the cheesecake is done?
The edges should be set, and the center should have a slight jiggle. It will continue to set as it cools. - Can I freeze this cheesecake?
Yes, you can freeze it! Ensure it is well wrapped in plastic wrap and stored in a freezer bag. Just remember to thaw it in the refrigerator before serving.
Conclusion
And there you have it! Apple Pie Stuffed Cheesecake is not only a sweet blend of your favorite desserts, but it is also a show-stopping treat that everyone will love. With its creamy texture, flavorful apple filling, and a buttery crust, this dessert is bound to become a new favorite in your home.
So, gather your family and friends, whip up this delicious recipe, and create wonderful memories around the table. Happy baking!