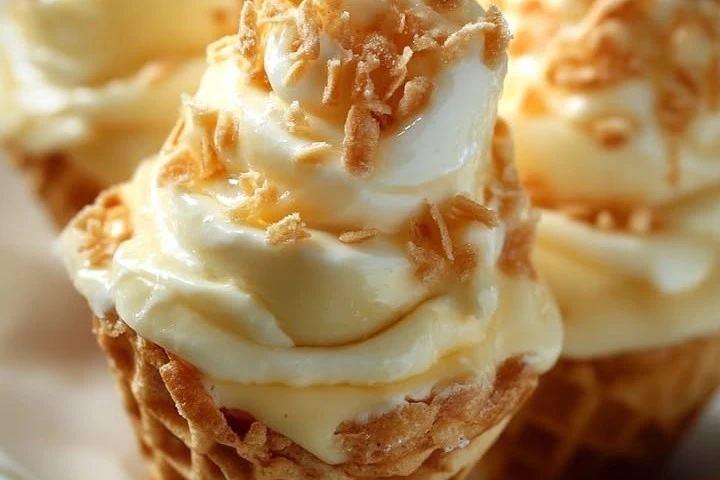
Banana Pudding Cheesecake Cones: A Fun Twist on a Classic!
Banana Pudding Cheesecake Cones: A Fun Twist on a Classic! : are you tired of the same old desserts? Do you want something that’s both delicious and fun to eat? If so, then Banana Pudding Cheesecake Cones are just the treat you need! This delightful dessert combines the creamy goodness of cheesecake and the classic flavors of banana pudding, all wrapped up in a crunchy cone. Not only do they taste incredible, but they also look appealing and are easy to serve. Let’s dive into the world of these yummy Banana Pudding Cheesecake Cones!

Why You Will Love This Recipe
Banana Pudding Cheesecake Cones are perfect for anyone who loves banana desserts. Here are a few reasons why you will love this recipe:
- Delicious Flavors: The combination of banana, creamy cheesecake, and crunchy wafers create a fantastic blend that everyone will enjoy.
- Fun to Eat: Unlike traditional desserts that require plates and forks, these cones are perfect for parties, picnics, or just a fun evening at home. You can eat them with your hands!
- Easy to Make: Even if you’re not an experienced baker, you’ll find this recipe straightforward and simple. It requires basic ingredients that you may already have in your kitchen.
- Versatile Presentation: You can decorate the cones to fit any occasion, making them a great choice for birthdays, holidays, or any special gathering.
- Customizable: Feel free to play with the ingredients and make this dessert your own!
With so many reasons to fall in love with these cones, let’s get started on how to prepare them.
How to Prepare Banana Pudding Cheesecake Cones
Ingredients:
Here’s what you will need to make Banana Pudding Cheesecake Cones:
- 1 cup cream cheese, softened
- 1 cup powdered sugar
- 1 cup heavy whipping cream
- 1 teaspoon vanilla extract
- 2 medium ripe bananas, sliced
- 1 package vanilla wafers
- 4-6 ice cream cones
- Optional: whipped cream for topping, extra banana slices or crushed wafers for garnish
Instructions:
Now that you have all your ingredients ready, follow these simple steps to create your Banana Pudding Cheesecake Cones:
- Prepare the Cheesecake Filling:
- In a mixing bowl, beat the softened cream cheese until smooth.
- Gradually add the powdered sugar and continue to beat until well combined.
- In another bowl, whip the heavy cream until stiff peaks form.
- Gently fold the whipped cream into the cream cheese mixture until everything is combined. Be careful not to overmix.
- Assemble the Cones:
- Take your ice cream cones and spoon some cheesecake filling into the bottom of each cone.
- Add a layer of sliced bananas on top of the cheesecake filling.
- Crush a few vanilla wafers and sprinkle them over the bananas for a little crunch.
- Repeat the layers until the cones are filled to the top, ending with a layer of cheesecake filling.
- Decorate:
- If you’d like, pipe some whipped cream on top of each cone for an extra special touch.
- You can also add additional banana slices or crushed wafers on top for garnish.
- Chill:
- Place the assembled cones in the refrigerator for about 30 minutes. This will help the filling set and make them even more delicious.
- Serve:
- Once chilled, they are ready to serve! Enjoy these delightful cones with family and friends.
How to Serve Banana Pudding Cheesecake Cones
Serving Banana Pudding Cheesecake Cones is easy and fun! Here are a few ideas on how you can make your serving special:
- Individual Servings: Since these cones are already in individual servings, they make for a great quick grab and go dessert at parties or gatherings.
- Plate Presentation: Place a few cones on a colorful dessert platter. You can add extra banana slices and crushed wafers around the cones for a lovely look.
- Themed Decorations: If you’re serving these cones at a themed party, try to match the decorations to the event. For example, use tropical decorations for a summer party or bright colors for a birthday celebration.
- Accompaniment: Consider serving these cones with a scoop of vanilla ice cream or a small bowl of additional banana pudding for those who want even more banana goodness!
How to Store Banana Pudding Cheesecake Cones
If you have leftovers (though we doubt they will last long!), here’s how to store your Banana Pudding Cheesecake Cones:
- Refrigerate: Place any leftover cones in an airtight container and store them in the fridge. They are best eaten within 2-3 days.
- Avoid Freezing: We do not recommend freezing these cones. The ice cream cones will become soggy once thawed, and the textures of the cheesecake filling and bananas will not be the same.
- Assemble Fresh: If you want to make these cones ahead of time for an event, consider preparing the cheesecake filling and crying the bananas. Assemble the cones closer to serving time to keep them from getting soggy.
Tips for Preparing Banana Pudding Cheesecake Cones
- Use Ripe Bananas: Choose bananas that are ripe but not overripe. They should still hold their shape when sliced.
- Chill Your Ingredients: Make sure your cream cheese and heavy cream are cold for the best results. This helps the whipped cream hold its shape better.
- Avoid Overmixing: When folding the whipped cream into the cheesecake mixture, go gently to keep the mixture airy and light.
- Make It Your Own: Feel free to add ingredients like chocolate chips or nuts to the layers in the cones. Get creative!
Variations
If you want to try something a little different or cater to specific tastes, here are some variations you might enjoy:
- Chocolate Banana Cheesecake Cones: Add melted chocolate or cocoa powder to the cheesecake filling for a chocolate twist.
- Strawberry Banana Cones: Swap out some banana slices for fresh strawberries to create a strawberry-banana flavor.
- Peanut Butter Banana Cones: Mix peanut butter into the cheesecake filling for a richer and nutty flavor.
- Gluten-Free Version: Use gluten-free vanilla wafers and cones if you need to make this treat gluten-free!
Frequently Asked Questions
1. Can I use a different type of fruit in the cones?
Yes! While bananas are the star of this recipe, you can use other fruits such as strawberries, blueberries, or even peaches. Just make sure to adjust the flavors accordingly.
2. Can I prepare the cones in advance?
You can prepare the cheesecake filling and slice the bananas ahead of time. However, we recommend assembling the cones just before serving to avoid sogginess.
3. What can I do with leftover cheesecake filling?
If you have any cheesecake filling left over, you can use it as a dip for fruits, graham crackers, or other snacks. You could also layer it in a small dessert dish with crushed wafers and banana slices for a mini dessert.
Conclusion
Banana Pudding Cheesecake Cones are a fun and delicious alternative to traditional desserts. With their tasty layers and easy-to-hold cones, they are perfect for any occasion. Whether you are serving them at a party, bringing them to a picnic, or just enjoying a sweet treat at home, these cones are sure to be a hit! Follow this simple recipe, and you will impress everyone with your baking skills. Enjoy your tasty treats!