Cotton Candy Popcorn: A Sweet, Nostalgic Treat You Can Make at Home
Looking for a playful, flavorful snack that brings back memories of carnivals and summer fairs? Cotton Candy Popcorn is the ultimate homemade treat that combines the fluffy crunch of popcorn with the sugary magic of cotton candy flavor. Whether you’re prepping for a party, a movie night, or just want something unique to snack on, this colorful creation is guaranteed to delight both kids and adults. The best part? It’s easy to make and can be customized with colors, sprinkles, and fun flavor variations.
Table of Contents
Ingredients
Here’s what you’ll need to whip up your own batch of cotton candy popcorn:
- 10 cups popped popcorn (about 1/2 cup kernels)
- 1/2 cup (1 stick) unsalted butter
- 1 cup granulated sugar
- 1/4 cup light corn syrup
- 1/4 cup water
- 1/8 teaspoon salt
- 1/2 teaspoon vanilla extract
- 1/2 teaspoon cotton candy flavoring (such as LorAnn)
- Gel food coloring (pink, blue, or both – optional)
- Sprinkles (optional)
Instructions
Step 1: Prep the Popcorn
Begin by popping your popcorn using your preferred method—air-popped, stovetop, or a popcorn maker. Once it’s ready, place the popcorn in a large mixing bowl. Make sure to remove any unpopped kernels. Line a large baking sheet with parchment paper and set it aside for later.
Step 2: Make the Candy Coating
In a medium saucepan over medium heat, melt the butter. Add the sugar, light corn syrup, water, and salt. Stir constantly until the mixture is well combined and the butter is fully melted.
Step 3: Bring to Boil
Increase the heat slightly and allow the mixture to come to a gentle boil without stirring. Let it cook until it reaches 235°F on a candy thermometer (this is known as the soft-ball stage), which takes about 4–5 minutes.
Step 4: Add Flavors and Color
Once the syrup reaches temperature, remove it from heat. Immediately stir in the vanilla extract and cotton candy flavoring. If you’re using gel food coloring, add it now to create the desired pink, blue, or multicolored hue.
Step 5: Coat the Popcorn
Pour the hot candy mixture over the popcorn. Using a wooden spoon or heat-resistant spatula, stir gently but thoroughly to ensure all pieces are evenly coated.
Step 6: Add Sprinkles and Cool
Spread the coated popcorn in a single layer over your parchment-lined baking sheet. While it’s still warm and sticky, sprinkle with colored sprinkles for extra fun and texture. Allow the popcorn to cool for at least 30 minutes until set.
Step 7: Serve or Store
Once fully cooled, break the popcorn into clusters. Serve immediately, or store it in an airtight container to maintain freshness.
Benefits of This Craft
Cotton candy popcorn isn’t just a tasty treat—it’s a fun and interactive activity that brings people together. It’s perfect for birthday parties, sleepovers, and holiday celebrations. Because the recipe allows for creativity in color and toppings, it’s an excellent project for kids who want to help in the kitchen. Beyond the fun, it’s also budget-friendly. You get a gourmet-style popcorn snack without paying specialty store prices. Plus, making your own means you can control the ingredients and customize it to suit dietary needs or flavor preferences.
Tips
Use a candy thermometer for best results to ensure the syrup reaches the right consistency. If you don’t have one, test by dropping a small bit of syrup into cold water—it should form a soft, flexible ball. For a crunchier finish, bake the coated popcorn at 250°F for 30 minutes, stirring halfway through. You can double the batch for parties or divide it between two colors for a swirl effect. Avoid adding sprinkles too early—they’ll melt into the syrup. Instead, wait until the coated popcorn is on the baking sheet.
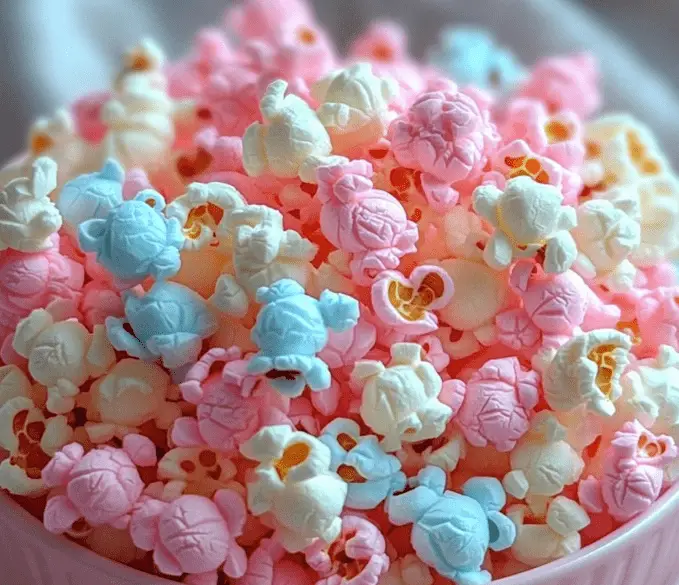
What Taste Look Like
Cotton candy popcorn has a delightful sweet crunch, balanced by the airy lightness of popcorn. The flavoring gives it that unmistakable cotton candy taste—light, sugary, and slightly fruity. When colored, the popcorn becomes visually festive, resembling candy-coated gems in pastel pinks and blues. The sprinkles add not just a decorative touch but also an extra layer of texture and sweetness. It’s a treat that looks as fun as it tastes and is sure to brighten up any table or snack bowl.
How to Store
To keep your cotton candy popcorn fresh and crunchy, store it in an airtight container at room temperature. It should last up to five days, although it’s usually eaten long before then. Avoid refrigeration, as humidity can make the popcorn sticky and cause the coating to melt. If you’re gifting it, place the popcorn in cellophane bags tied with colorful ribbons for a festive presentation. For longer-term storage, use vacuum-sealed containers, though the texture may soften over time.
Cotton Candy Popcorn is a fun, nostalgic, and delightfully sweet snack that’s sure to bring smiles to everyone who tries it. With its vibrant colors, sugary coating, and hint of carnival charm, it’s the perfect homemade treat for parties, holidays, or anytime you want to make snack time feel special. This easy-to-follow recipe uses simple ingredients and gives you full control over flavor and style. Once you try making it yourself, you’ll never go back to store-bought popcorn again.
For More DIY craft ideas, visit More DIY craft ideas
FAQ
Can I use microwave popcorn?
Yes, but make sure it’s plain or lightly salted. Avoid using buttered or flavored varieties, as they may interfere with the coating.
Is cotton candy flavoring necessary?
To get the true nostalgic flavor, cotton candy flavoring is recommended. You can substitute with other extracts like raspberry or bubblegum for similar effects.
Can I make this recipe vegan?
Yes, use a plant-based butter substitute and check that your food coloring and flavoring are vegan-friendly.
What kind of food coloring works best?
Gel food coloring produces vibrant colors without adding too much liquid to the candy mixture.
Can I use this recipe for popcorn balls?
Absolutely. Let the coated popcorn cool slightly, then form into balls with greased hands before it fully hardens.