DIY Dinosaur Fossil Rocks: A Hands-On Adventure for Young Explorers
Few things spark a child’s imagination quite like dinosaurs. Whether it’s watching them come to life in books or digging them up at a museum, kids are fascinated by the prehistoric world. This DIY Dinosaur Fossil Rocks activity brings that fascination home, allowing children to become little paleontologists as they dig, discover, and explore fossils they’ve made themselves. It’s a creative and interactive craft that combines art, science, and sensory play—all in one exciting project.
Ideal for birthday parties, educational lessons, rainy days, or weekend fun, this craft is easy to prepare and endlessly fun. Kids will love the process of making the rocks, embedding their dinosaur treasures, and then excavating them later using small tools. For parents and teachers, it’s a fantastic way to sneak in some learning while kids are having a blast.
For even more crafts that inspire creativity and curiosity, visit More DIY craft ideas and browse projects that turn everyday moments into unforgettable adventures.
Table of Contents
Ingredients
Here’s everything you need to make your own dinosaur fossil rocks:
- 1 cup all-purpose flour
- 1 cup dry coffee grounds (make sure they are completely dried)
- 1/2 cup table salt
- 1/2 cup fine sand (play sand or craft sand works best)
- Approximately 3/4 cup water (adjust as needed)
- Small plastic dinosaur toys or fossil molds
You’ll also need a mixing bowl, a tray for drying, and optional tools like brushes or spoons for excavation.
Instructions
Step 1: Mix the Dry Ingredients
In a large mixing bowl, combine the flour, dried coffee grounds, salt, and sand. Stir everything together until the texture is uniform. The coffee grounds add a gritty, aged texture to the dough that mimics real sedimentary rock.
Step 2: Add Water Gradually
Slowly pour in the water while mixing. The goal is to create a dough that holds together well without being too sticky. If your mixture feels too wet, add more flour. If it’s too dry or crumbly, add a touch more water.
Step 3: Shape and Imprint
Take a portion of the dough and either flatten it slightly to press a dinosaur toy or mold into it, or wrap it around the toy to form a solid “fossil rock.” The second method adds an extra layer of fun when kids crack it open to discover what’s hidden inside.
Step 4: Dry the Rocks
Let your fossil rocks air-dry on a tray for 24 to 48 hours, flipping them occasionally for even drying. For a quicker option, bake them in the oven at 200°F (about 93–95°C) for 30 minutes until firm and dry to the touch.
Step 5: Time for Excavation
Once dried and cooled, the rocks are ready for play. Give your kids small brushes, spoons, or even toothpicks and let them carefully dig and brush away the material to reveal their “fossils.” This part of the activity is where imagination and fine motor skills come into play.
Benefits of This Craft
The DIY Dinosaur Fossil Rocks activity is more than just a fun afternoon—it’s packed with developmental and educational benefits:
- Encourages Curiosity: Mimicking real paleontological digs introduces children to Earth science and history in a playful way.
- Promotes Sensory Exploration: Kids experience different textures and materials through hands-on play.
- Enhances Fine Motor Skills: Digging and brushing help develop precision, patience, and hand-eye coordination.
- Builds Creativity: Children can decorate their fossils, choose their toy placements, and create their own prehistoric stories.
- Eco-Friendly and Cost-Effective: Made with simple pantry staples and repurposed toys, this craft is inexpensive and low-waste.
- Educational Tool: Perfect for homeschooling or classroom units on geology, fossils, or dinosaurs.
Tips
- Use a variety of small toys or molds to keep each rock unique and exciting to uncover.
- Make sure your coffee grounds are thoroughly dried before mixing—wet grounds can make the dough too sticky.
- Store extra dough in the refrigerator for up to a day if you’re not using it all at once.
- If your child is young, supervise the digging process to ensure safe handling of small tools.
- Want an extra challenge? Bury the rocks in a sandbox or garden for a mini fossil hunt experience.
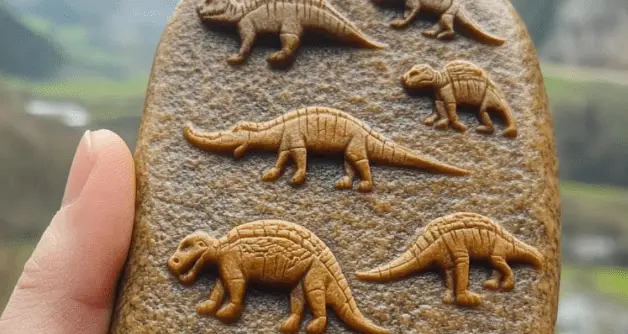
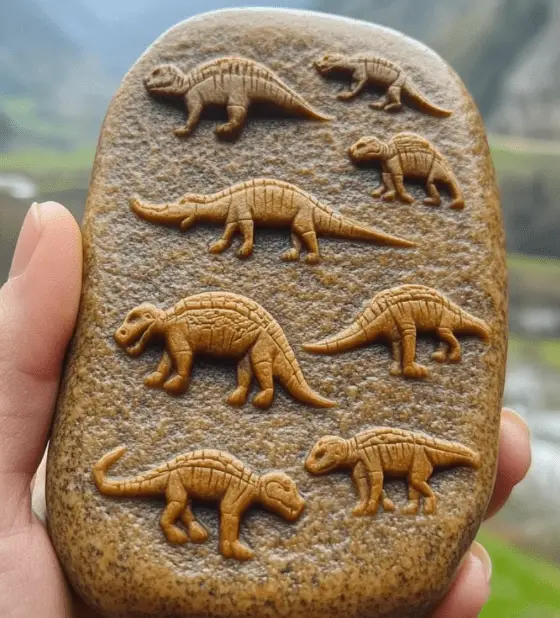
What Do They Look Like?
The finished fossil rocks resemble weathered stones you might find in nature. Their gritty texture and dark speckled appearance—thanks to the coffee grounds—make them convincingly prehistoric. Each rock is unique in shape and size, with some showing the faint imprint of a dino mold, and others hiding surprises inside. Once excavated, the joy of discovery is enhanced by the realistic appearance and earthy aroma of the rocks.
How to Store
Here’s how to store your DIY dinosaur fossil rocks and materials:
- Before Drying: Store unused dough in an airtight container in the fridge for up to 24 hours.
- After Drying: Keep completed rocks in a cardboard box or tray in a cool, dry area. Avoid moisture and direct sunlight.
- For Play: Place excavation tools and rocks in a reusable bin or box to make them easily accessible for future play sessions.
- Once used, rocks may crumble and become brittle. Consider creating new ones if they break during play.
Conclusion
DIY Dinosaur Fossil Rocks are a brilliant way to mix learning and play. They’re easy to make, fun to explore, and offer endless opportunities for storytelling, digging, and creative thinking. Whether you’re organizing an afternoon craft or planning an educational activity, this project is a surefire way to captivate curious minds and unleash prehistoric excitement.
For even more engaging, educational, and imaginative projects, don’t forget to check out More DIY craft ideas and discover how much fun learning at home can be.
You can also get inspired visually by exploring this fossil rock activity on Pinterest:
Dinosaur Fossil Rock Craft on Pinterest
FAQ
Q: Can I use this recipe with other types of toys?
A: Yes. Small animals, gemstones, or even shells work great. Just make sure they’re non-toxic and safe for kids.
Q: How long do the fossil rocks last?
A: When stored properly in a dry place, they can last several weeks. However, they may begin to crumble over time, especially after repeated use.
Q: Can this be used in a classroom?
A: Absolutely. This activity is ideal for science lessons and group activities. Prepare materials in advance to save time.
Q: Are these safe for toddlers?
A: Yes, with adult supervision. Make sure all embedded items are large enough to avoid choking hazards.
Q: Can I make these without sand?
A: While sand adds realistic texture, you can substitute it with additional flour or dried rice flour, though the result may be slightly smoother.