DIY Dinosaur Fossils: A Prehistoric Craft Adventure for Curious Kids
Bringing prehistoric imagination to life has never been easier or more fun. With these easy-to-make DIY Dinosaur Fossils, your children can become mini paleontologists, creating their own ancient imprints using simple household ingredients. This hands-on activity is more than just playtime—it’s a fantastic way to mix education, creativity, and tactile exploration in one exciting craft. Whether you’re a teacher, a parent, or a craft enthusiast looking for a new idea, this project promises both entertainment and learning opportunities for kids of all ages.
This salt dough dinosaur fossil activity is especially great for rainy days, themed birthday parties, or as part of a homeschool science lesson. It allows kids to explore textures, shapes, and patterns while engaging in storytelling and role-play. Plus, once the fossils are baked and hardened, they become keepsakes or can be used in a homemade excavation game.
Table of Contents
Ingredients
To create your DIY dinosaur fossils, gather the following items:
- 2 cups flour
- 1 cup salt
- 1/2 cup warm water
- Plastic dinosaurs
- Plastic dinosaur skeletons
These ingredients are easy to find and completely safe for children. The use of salt dough makes this project both cost-effective and customizable, allowing for endless fossil designs and impressions.
Instructions
1. Make the salt dough
In a large mixing bowl, combine 2 cups of flour and 1 cup of salt. Gradually pour in 1/2 cup of warm water, stirring as you go. Mix until a soft, workable dough forms. It should not be sticky but pliable enough for small hands to shape with ease.
2. Shape the dough
Pinch off small portions of the dough and roll them into balls. Then, flatten each ball with your hands or the bottom of a cup to form a flat disc. These will serve as your fossil “stones.”
3. Create the impressions
Press a plastic dinosaur or dinosaur skeleton toy gently into the dough to leave a clear imprint. Carefully lift the toy away to reveal your fossil design. Repeat the process, experimenting with different figures and angles for variety.
4. Personalize your fossils
Encourage kids to get creative by adding their own designs around the fossils. They can draw with toothpicks or layer textures using other safe household items like shells, leaves, or even toy wheels.
5. Prepare to bake
Place all finished fossils on a baking tray lined with parchment paper or foil. Space them evenly to ensure they cook properly.
6. Bake your fossils
Preheat the oven to 250°F (120°C). Bake the salt dough fossils for 1 to 2 hours, or until they are firm and dry to the touch. Thicker fossils may require slightly more time, so keep a close eye on them.
7. Cool and display
Once baked, remove the tray from the oven and allow the fossils to cool completely. Now your little explorers can admire their ancient creations—or even use them in a fun fossil dig.
Benefits of This Craft
This DIY dinosaur fossil activity offers multiple benefits beyond fun. It introduces young minds to the concept of fossils, geology, and ancient life in an interactive and age-appropriate way. Making salt dough also strengthens fine motor skills, hand-eye coordination, and sensory awareness.
This project encourages:
- Educational play and science exploration
- Open-ended creativity and self-expression
- Confidence-building through hands-on learning
- Quality bonding time between children and adults
- Use of everyday ingredients for a budget-friendly experience
Because this activity doesn’t rely on screens or electronic tools, it’s a welcome break from digital overload while still keeping kids fully engaged.
Tips for Success
- Use warm water: This helps the salt dissolve more easily into the flour, creating a smoother dough texture.
- Knead well: If the dough feels too dry or crumbly, add a splash of water. If it’s too sticky, sprinkle in a bit more flour.
- Choose lightweight toys: Plastic dinosaurs work best because they leave clean impressions and are easy for small hands to manipulate.
- Watch the oven time: Since thickness can vary, check the fossils after the first hour. They should be firm but not overly browned.
- Store extra dough: You can wrap leftover salt dough in plastic wrap and keep it in the refrigerator for a day or two for more crafting later.
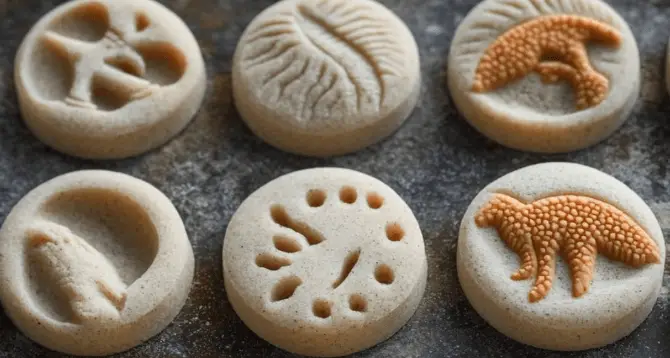
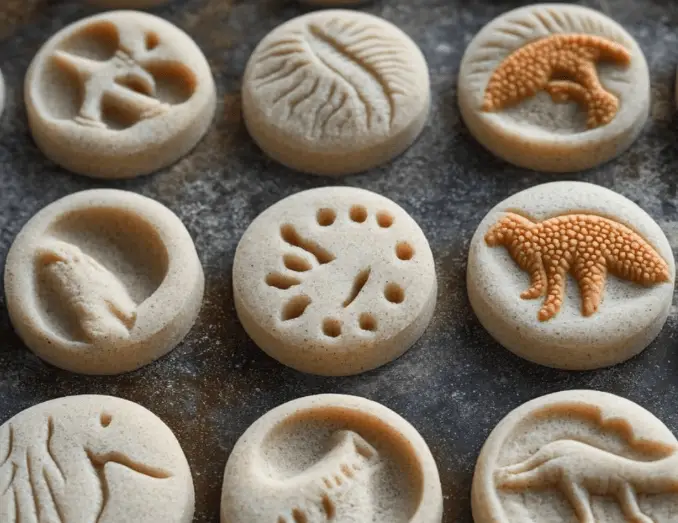
What Do These Fossils Look Like?
Once baked, the dinosaur fossils have a matte, stone-like appearance, complete with detailed impressions of prehistoric creatures. The surface may have a slight grainy texture from the salt, which adds to their ancient charm. Depending on the toys used, some fossils may show intricate bone shapes, scales, or claws. They’re perfect for imaginative play or even for decorating a dinosaur-themed bedroom or science corner.
How to Store
Finished fossils can be stored in a dry, cool place. Keep them in a lidded box or open basket if they’ll be used for play. Make sure they are completely cooled and dry before storing to prevent any moisture buildup. These fossils are not meant to be exposed to water or used outdoors long-term, as salt dough can absorb moisture and soften over time.
If you’d like to preserve the fossils for the long term or use them as decorations, you can coat them with a layer of clear, non-toxic acrylic sealer or mod podge to protect the surface.
DIY Dinosaur Fossils are the kind of craft that sparks creativity and opens the door to learning. They’re tactile, fun, and allow kids to explore their curiosity about prehistoric life through play. With just flour, salt, water, and a few plastic toys, you can create an exciting world of fossils right at your kitchen table.
This craft is ideal for classrooms, homeschooling families, museums, playdates, and rainy-day entertainment. It’s a wonderful introduction to science through hands-on discovery.
For more hands-on learning activities and creative fun, make sure to visit More DIY craft ideas for your next project.
FAQ
Can I paint the fossils after baking?
Yes, once completely cool, they can be painted with acrylic paint or washable kids’ paint for an even more realistic effect.
Is this craft suitable for toddlers?
Yes, with supervision. Toddlers can press toys into the dough while adults handle the baking.
Can I use air-dry clay instead of salt dough?
You can, but the texture and final look may vary. Salt dough is preferred for its natural, stone-like finish.
Can the fossils be reused in different activities?
Absolutely. Use them in pretend archaeological digs, scavenger hunts, or even for storytelling sessions.
How long do the fossils last?
If stored properly, they can last for several months or even years as keepsakes. Avoid humidity and handling with wet hands.