Fizzing Hatching Dino Eggs: A Roaring DIY Science Craft for Kids
If you’re searching for a hands-on science activity that will delight kids while sneaking in a bit of chemistry, look no further than Fizzing Hatching Dino Eggs. This colorful DIY project combines baking soda, vinegar, and miniature dinosaur toys to create a fizzy eruption that reveals a hidden surprise. Not only is it entertaining, but it’s also educational, sensory-rich, and easy to put together with household materials.
Perfect for dinosaur-themed parties, homeschool science lessons, or rainy day playtime, this craft is a favorite among kids who love mixing, molding, and discovering. The fizzing action mimics a volcanic eruption while the hidden toy gives an extra layer of excitement—making learning fun and tactile.
Table of Contents
Ingredients
To get started, you’ll need the following items:
- 1 cup Arm & Hammer Baking Soda per egg
- 1–2 cups Vinegar (enough to dissolve the eggs)
- Miniature dinosaur toys
- Large bowls
- 1/4 to 1/3 cup water per egg
- Food coloring (any color)
- Spray bottle for vinegar (optional)
- Rubber gloves (optional)
- Cookie sheet or tray for drying
These simple ingredients are inexpensive and easy to find. Most can be sourced from your pantry or local grocery store, making this a low-prep, high-impact project.
Make the Dough
Start by pouring one cup of baking soda into a large bowl. In a separate cup, mix 1/4 to 1/3 cup of water with several drops of food coloring. Slowly add the colored water to the baking soda, mixing with a spoon or your hands until you form a moldable dough. The consistency should be similar to wet sand—damp enough to hold its shape but not too soggy.
You can use rubber gloves to avoid staining your hands during this step, especially when using dark food coloring.
Shape the Dino Eggs
Once the dough is ready, scoop a small amount into your hand or onto a flat surface. Place one miniature dinosaur toy in the center, then pack more of the baking soda dough around it. Mold it gently into an egg shape, making sure the toy is completely hidden. Repeat the process for each egg you want to make.
Place the finished eggs onto a cookie sheet or tray lined with parchment paper or foil to prevent sticking.
Let Dry
Allow your dino eggs to dry for several hours or overnight. This step helps them firm up and makes the fizzing reaction more dramatic. Drying also ensures the eggs hold their shape when handled by little hands. If you’re short on time, placing the tray in front of a fan can speed up the process.
Hatch the Dino Eggs
Now for the most exciting part—hatching the eggs. Fill a small bowl or cup with vinegar and either pour it directly over the eggs or use a spray bottle for more control. As the vinegar hits the baking soda, it will fizz, bubble, and slowly dissolve the egg, revealing the hidden dinosaur toy inside.
Kids can take turns hatching their eggs or do them all at once for a full-on fizzy frenzy.
Hatch More Eggs
Keep the fun going by preparing extra eggs in advance. Try using different colors for each egg, or hide different types of toys like bugs, gems, or fossils for variation. Let the children guess what’s inside before the fizz reveals the surprise.
You can also experiment with reaction speed by changing the vinegar temperature or using a mix of lemon juice and vinegar.
Benefits of This Craft
Fizzing Hatching Dino Eggs aren’t just fun—they’re also packed with educational and developmental value:
- Introduces basic chemistry concepts like acid-base reactions in a visual and hands-on way.
- Encourages sensory play through squishing, molding, and watching the fizzy eruptions.
- Enhances fine motor skills as children scoop, shape, and pour.
- Promotes imaginative play once the dinosaurs are freed, extending the activity beyond the experiment.
- Boosts scientific thinking by allowing kids to observe, predict, and ask questions about the reaction process.
This craft is perfect for preschoolers, early elementary students, or anyone with a fascination for dinosaurs and science.
Tips
To make your fizzing egg experience even more engaging, here are some helpful tips:
- Use white vinegar for the most visible reaction. Colored vinegar can muddy the color of the fizz.
- Make it multi-colored by using different food colorings in each egg for a rainbow hatch.
- Add glitter or biodegradable confetti to the dough for a magical sparkle effect.
- Make smaller eggs for quicker hatching or younger kids with limited attention spans.
- Use a deep tray or baking pan to contain the mess and make cleanup easier.
You can also set up a pretend excavation site using sand, rocks, and brushes to enhance the storytelling and extend the playtime.
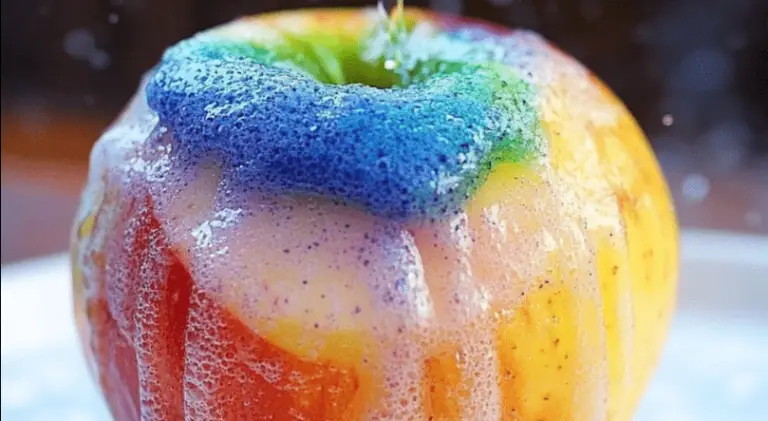
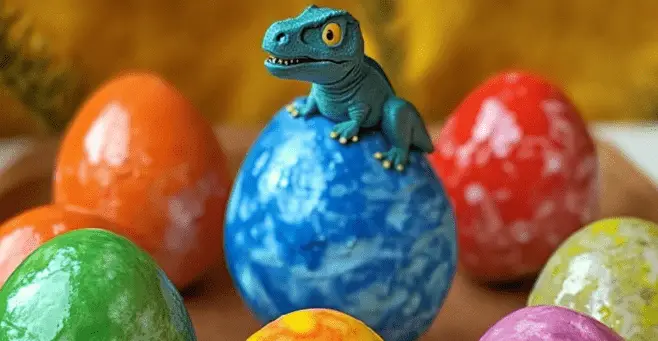
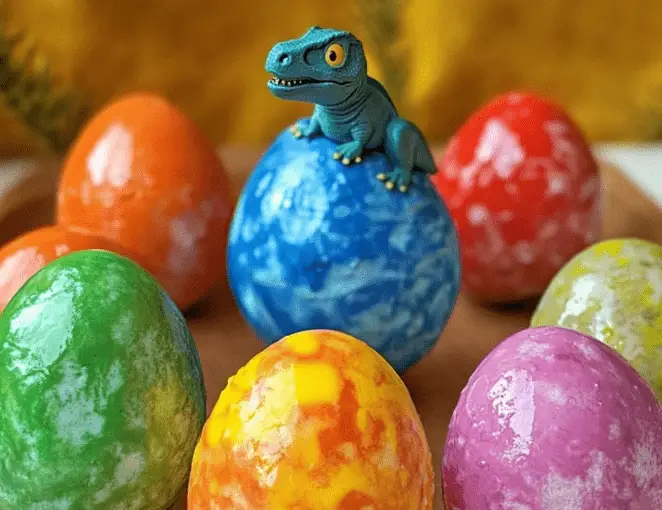
What Does It Taste and Look Like?
This activity is not edible, but the fizzing action and colorful ingredients create a visual treat. The baking soda dough resembles a chalky, pastel egg, while the food coloring adds a vibrant tone. As vinegar is poured over the egg, the baking soda begins to bubble and foam, gradually breaking down the egg to reveal the toy dinosaur inside.
The texture changes from crumbly to frothy and back again as the fizzing slows down. The eruption is soft and foamy with a satisfying hiss that adds to the sensory experience. The final surprise—a brightly colored dino—is always met with excitement and awe.
How to Store
While the activity is best enjoyed fresh, you can store unused materials and even pre-made eggs with a few precautions:
- Store pre-made eggs in an airtight container for up to 2 days. Make sure they are completely dry before sealing.
- Avoid humid environments that can cause the eggs to soften or fall apart.
- Keep vinegar in a tightly sealed bottle away from heat or sunlight to preserve its strength.
- Keep baking soda in its original container or an airtight jar for future projects.
- Clean up leftover fizz with warm water and a sponge. Everything used is safe for drains and easy to wipe away.
Storing ingredients separately allows you to recreate the experiment any time with minimal setup.
The Fizzing Hatching Dino Eggs activity is a delightful combination of science, creativity, and fun. It’s easy to set up, highly interactive, and packed with educational value, making it an ideal project for parents, teachers, and caregivers looking to entertain and educate at the same time. From the molding to the fizzing to the final dinosaur reveal, this activity keeps children engaged every step of the way.
Perfect for dino-themed parties, science units, or just a fun afternoon project, this craft encourages curiosity, play, and hands-on learning. Best of all, it uses common ingredients you likely already have at home.
For more creative projects like this one, visit More DIY craft ideas and discover activities that mix fun, learning, and a touch of magic.
FAQ
What kind of vinegar works best?
White distilled vinegar creates the most dramatic fizz. You can also use apple cider vinegar, but the reaction may be slightly milder.
Can I reuse the dinosaurs?
Absolutely. Rinse them off after the experiment and save them for future play or another batch of eggs.
Is this craft safe for toddlers?
Yes, with adult supervision. All ingredients are non-toxic, but small toys can pose a choking hazard for very young children.
How long does it take for the eggs to dry?
Depending on humidity, it can take anywhere from 4 hours to overnight for the eggs to fully harden.
Can I use lemon juice instead of vinegar?
Yes, lemon juice will trigger a similar reaction, though vinegar typically provides a stronger fizz.