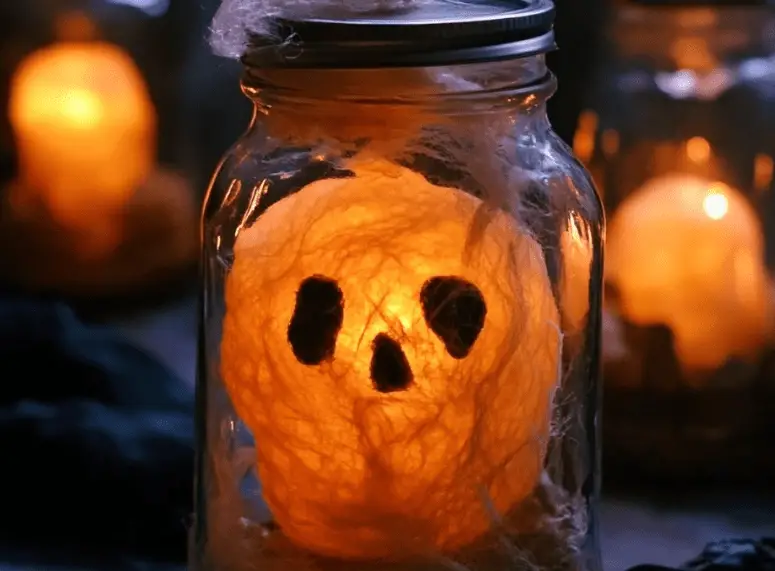
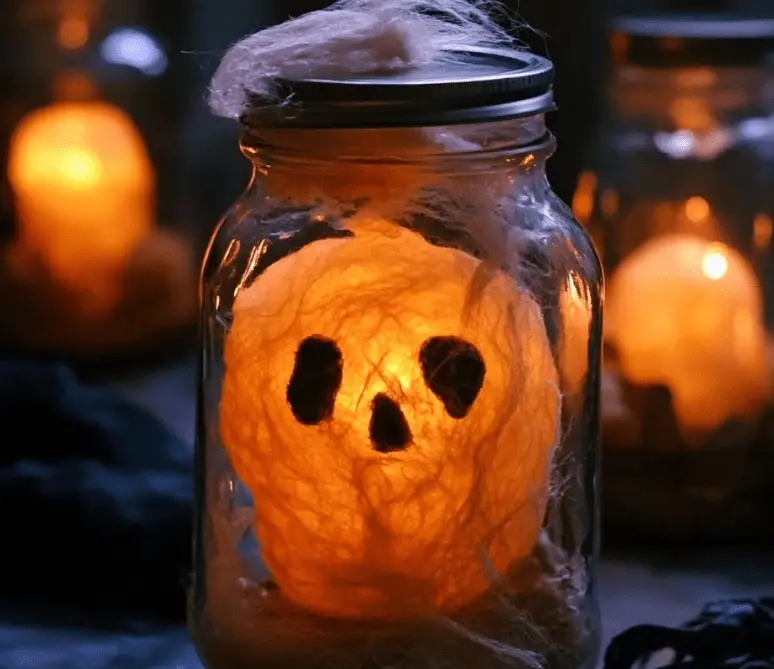
Ghost in a Jar: A Spooky Halloween Craft That Glows
When it comes to Halloween decorations, few things are as charmingly eerie as a homemade ghost in a jar. This simple yet creative DIY project combines glowing lights, ghostly figures, and haunting ambiance all tucked into a mason jar that looks straight out of a spooky storybook. Whether you’re setting the mood for a Halloween party, crafting with kids, or simply enjoying seasonal decor, this Ghost in a Jar craft delivers both atmosphere and fun.
This project is ideal for all ages and can be completed in just a few hours. With minimal supplies and a big impact, it’s a great choice for classrooms, family crafting nights, or anyone looking to add a magical touch to their Halloween decor.
Table of Contents
Ingredients
Here are the materials you’ll need to make your very own Ghost in a Jar:
- Quart size mason jar
- Tiny styrofoam balls
- Tiny glass bottles
- School glue
- Water
- Cheesecloth
- Creepy cloth
- Glue dots
- Electronic flickering tea lights
These supplies are easy to find at any craft store or online retailer, and they’re budget-friendly for group projects.
Instructions
- Start by creating a little armature to hold your cheesecloth ghosts while they dry. Use hot glue to attach a 1-inch styrofoam ball to a 2-inch tall glass bottle.
- Cut out circles of cheesecloth, about 3-4 inches in diameter.
- In a cup or bowl, mix 1 tablespoon of white school glue with 1/3 cup of water until well combined.
- Soak the cheesecloth circles in the glue mixture, then wring out any excess liquid.
- Drape the soaked cheesecloth over your armature, adjusting it for the perfect ghostly drape. Let dry for at least 2-3 hours.
- Once fully dry, gently remove the ghost from its form.
- Take a third of the black creepy cloth and wad it into the bottom of your mason jar to fill about 2 inches.
- Decide where to place your ghost in the jar, typically about 1 to 2 inches above the creepy cloth.
- Add a glue dot to the back of your ghost and press it firmly against the side of the jar.
- Stick a couple more glue dots inside the jar lid, then insert the flickering tea light.
- Turn on the light, screw the lid back onto the jar, and enjoy your glowing Halloween display.
This craft doesn’t require advanced skills, making it accessible even for beginner crafters.
Benefits of This Craft
Creating a Ghost in a Jar offers several benefits beyond the final product itself. It’s an enjoyable and meaningful way to celebrate the Halloween season.
Hands-On Creativity
The tactile experience of building ghosts from cheesecloth and placing them in a carefully curated jar encourages creativity in both children and adults. Each ghost can be unique, and there’s no wrong way to make one.
Perfect for Themed Decor
This craft fits perfectly into haunted house themes, gothic table settings, and spooky shelves. Because it’s contained in a jar, it’s also mess-free and easy to display indoors.
Sensory Play for Kids
Manipulating materials like glue-soaked fabric and textured cloth provides a sensory-rich experience that young children especially enjoy. It supports fine motor skills and hand-eye coordination.
Family Bonding
Crafting together is a great way to build memories. Kids love working alongside adults, and this project is short enough to hold their attention while still being engaging.
Reusable and Customizable
You can reuse the jar and lights for other seasonal crafts or add custom touches like painted labels, spider webs, or mini tombstones for different effects.
Tips
- Use Transparent Glue: Clear school glue can prevent the cheesecloth from becoming too milky or stiff.
- Dry Thoroughly: Make sure ghosts are completely dry before handling to prevent tearing.
- Create in Batches: Make multiple ghosts in one sitting and assemble several jars for a coordinated decoration theme.
- Customize Lighting: Use color-changing LED tea lights for a mystical effect or orange lights for a classic Halloween glow.
- Secure the Lid: If using outdoors or in a high-traffic area, secure the lid with tape or a rubber seal to prevent the ghost from shifting.
What Taste Look Like?
While this craft isn’t edible, the “taste” in terms of design is delightfully eerie and atmospheric. The cheesecloth ghosts appear ethereal and float-like, while the flickering light casts soft shadows that make the jar look like it holds a real haunting presence. The translucent fabric, paired with glowing effects, creates a mystical ambiance that captures the essence of Halloween. It looks ghostly without being too scary, making it a great choice for all ages and decor styles.
How to Store
Proper storage ensures your Ghost in a Jar lasts for years to come.
- Keep in a Cool, Dry Place: Humidity can affect the glue in the cheesecloth, so avoid storing in basements or humid areas.
- Use Tissue or Bubble Wrap: To protect the jar and ghost inside, wrap it gently in tissue paper or bubble wrap when not on display.
- Avoid Crushing the Ghost: Store upright in a container or on a shelf where nothing presses against the jar to maintain the shape of the ghost.
- Remove Batteries: If your tea light uses batteries, remove them when storing to prevent corrosion.
With these tips, your ghost jar can be a recurring star in your Halloween collection.
Crafting a Ghost in a Jar is more than a simple seasonal project—it’s an engaging, hands-on experience that combines creativity, décor, and Halloween spirit into one glowing keepsake. With just a few supplies and a bit of imagination, you can create something that adds charm and atmosphere to your spooky celebrations. This project is great for families, classrooms, and anyone who loves DIY decorations.
If this spooky creation inspired you, check out even more More DIY craft ideas to keep the creativity going all season long.
Pinterest is also full of inspiring ghost jar crafts and other Halloween ideas—just search for “Ghost in a Jar DIY” to see endless variations and clever designs shared by crafters around the world.
Frequently Asked Questions
Q: Is this safe for young children to make?
A: Yes, with adult supervision. Children can help with soaking and draping the cheesecloth, but an adult should handle hot glue and cutting fabric.
Q: How long does this project take from start to finish?
A: About 2-3 hours including drying time. The hands-on portion only takes 20–30 minutes.
Q: Can I use a real candle instead of a tea light?
A: No, real candles should not be used due to the flammable nature of cheesecloth and creepy cloth. Always use electronic lights.
Q: Can I paint the jar or add other decorations?
A: Yes, feel free to decorate the outside of the jar with paint, stickers, or vinyl cutouts to personalize your creation.
Q: Will the ghost stay upright inside the jar?
A: Yes, if secured with glue dots. Be sure to press the ghost firmly against the glass and avoid shaking the jar.