Ghost in a Jar Craft: A Spooky DIY Decoration for Halloween Magic
Ghost in a Jar Craft : Looking for a Halloween craft that combines eerie charm with family-friendly fun? This Ghost in a Jar is the perfect spooky DIY project to bring a touch of glow-in-the-dark magic to your seasonal décor. With just a few affordable materials and a bit of creativity, you can craft an eye-catching miniature ghost scene inside a mason jar—ideal for mantels, shelves, or even as a centerpiece for your Halloween party.
Whether you’re crafting with kids or just love adding personal touches to your holiday decorating, this ghostly jar is a quick and delightful activity. It uses simple techniques and everyday supplies like felt, moss, polymer clay, and fishing line to bring your glowing ghost to life.
For more DIY Halloween decorations that are both creepy and cute, check out our Mini Witch Jar Lanterns for another craft that lights up your spooky nights.
Table of Contents
Ingredients
To make your very own glowing ghost in a jar, gather the following materials:
- Glow in the dark polymer clay
- Black polymer clay
- Felt (black and orange)
- Moss
- Mason jar(s)
- Fiber fill stuffing or cotton balls
- Fishing line or clear jewelry cord
- Pony bead or other bead type
Most of these supplies can be found at local craft stores or online. Be sure to use clear mason jars so the glowing effect shows through beautifully.
Instructions
1. Shape the Ghost
Start by using your glow in the dark polymer clay to form the ghost. Roll the clay out to about 1/4 inch thick. Pinch and shape the edges to create soft, ruffled folds. Push up the center to mimic a draped ghost shape.
2. Add Eyes
Take a small amount of black polymer clay and roll it into tiny balls to create eyes. Press them onto the ghost’s face and use a toothpick to make a hole through the top of the ghost’s head. This hole will be used to thread the fishing line for hanging.
3. Bake the Ghost
Follow the baking instructions on the polymer clay package. Usually, it requires 15–30 minutes at 275°F depending on the thickness. Let the ghost cool completely once baked.
4. Make the Base
Using your mason jar lid as a template, cut out a circle of black or orange felt. Glue pieces of moss and fiber fill stuffing onto the felt to make a whimsical, cloud-like ground. This serves as the decorative base inside the jar.
5. Assemble the Hanging Ghost
Thread a piece of fishing line or clear jewelry cord through the ghost’s head. Slide a pony bead onto the cord and tie a secure knot to keep the ghost from slipping off.
6. Place the Ghost in the Jar
Gently lower the ghost into the mason jar. Poke a small hole in the jar lid, thread the fishing line through the hole, and adjust the height of the ghost so it floats above the moss. Use tape to secure the line to the top of the lid from the inside.
7. Finish the Lid
Place the felt circle with moss inside the jar, then screw on the metal ring to hold everything in place. Your ghost is now suspended and glowing in its eerie little habitat.
This spooky yet charming decoration is now ready to light up your Halloween night.
Benefits of This Craft
Creating a ghost in a jar goes beyond just holiday décor—it provides a range of hands-on benefits:
- Encourages creativity: Kids and adults alike can personalize their ghosts and jar themes.
- Affordable crafting: All ingredients are budget-friendly and reusable.
- Sensory activity: Great for developing fine motor skills, especially in children.
- Reusable decoration: Can be stored and brought out year after year.
- No mess, no paint: This is a neat and tidy project with minimal cleanup required.
Tips
To ensure your ghost in a jar turns out perfectly, here are a few helpful tips:
- Use high-quality polymer clay: This ensures a smoother finish and better glow effect.
- Avoid using too much fishing line: Measure the length carefully so your ghost appears to float mid-jar.
- Secure the bead tightly: A loose bead may slide and cause the ghost to tilt.
- Use a needle or pin for lid holes: This gives you more control over the hole placement.
- Test glow levels: Charge the ghost under a bright light before placing it in the jar to ensure it glows well in the dark.
You can even personalize your jar by adding spooky mini pumpkins, glitter, or glow-in-the-dark paint along the sides.
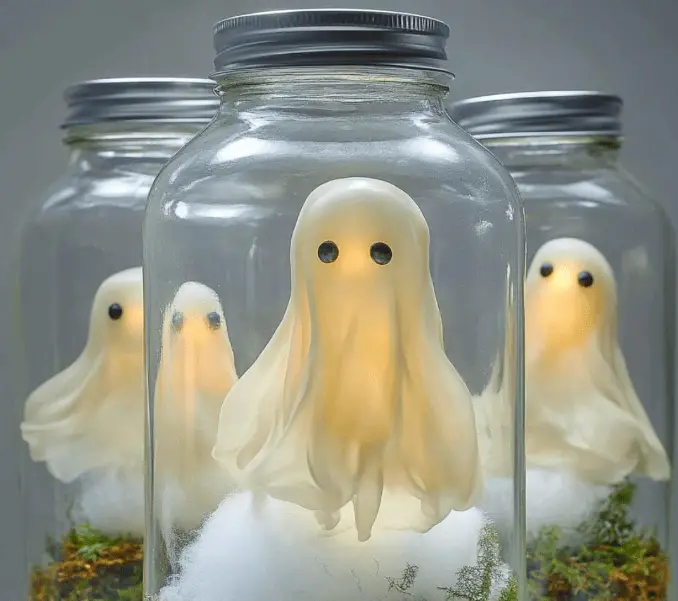
What Does It Look Like?
The finished Ghost in a Jar resembles a magical Halloween snow globe. Inside the mason jar, a glowing ghost floats just above a soft base of moss and cloud-like stuffing. The ghost’s draped form creates an illusion of movement, and when the lights go out, the glow-in-the-dark clay gives off a soft, spectral light.
By day, the jar serves as a charming centerpiece or windowsill display. By night, it becomes an enchanting little lantern that adds an atmospheric touch to any Halloween setting.
Each jar can be customized to look spooky, silly, or elegant depending on your materials and design choices.
How to Store
You can keep your ghost in a jar for many Halloweens to come with proper storage:
- Store in a cool, dry place to prevent mold or discoloration.
- Wrap in tissue paper or bubble wrap if packing multiple jars together.
- Avoid moisture: Keep away from humid areas to preserve the moss and felt.
- Replace glow feature yearly: If the glow dims over time, consider repainting with glow-in-the-dark paint or crafting a new ghost.
When stored properly, this decoration will last for years with minimal maintenance.
Conclusion
This Ghost in a Jar craft is the perfect DIY for Halloween enthusiasts who want to mix spooky fun with hands-on creativity. It’s a unique and glowing piece of holiday décor that children and adults can enjoy making together. With just a few materials and a little imagination, you can bring this ghostly creation to life and brighten your home with a bit of eerie charm.
Whether you make one or a whole haunted collection, these jars are guaranteed to be a conversation starter and a yearly favorite among your decorations.
FAQ
Can I use glow-in-the-dark paint instead of clay?
Yes, but polymer clay gives the ghost a more durable shape and better texture.
Is this project safe for kids?
Yes, with adult supervision for baking and using sharp tools.
Can I use colored felt instead of black or orange?
Absolutely. Choose any color to match your Halloween décor theme.
How long will the glow last?
It depends on how long the ghost was exposed to light. Recharging it under a bright lamp can restore its glow.
What size jar is best?
Standard 16 oz mason jars work well, but larger jars allow for more detailed decorations.