Salt Volcano Experiment: A Fun and Fiery DIY Science Activity for Kids
The Salt Volcano Experiment is a captivating and educational science craft that transforms basic kitchen ingredients into a mini volcanic eruption. Perfect for curious kids and families, this activity brings chemistry to life in a way that’s visually stunning and easy to replicate. With just water, vegetable oil, salt, and an optional splash of food coloring, children can watch colorful bubbles rise and fall like a lava lamp in a jar. Whether you’re looking for a rainy-day project or a hands-on way to explain scientific concepts, this salt volcano is a fantastic blend of fun and learning.
Ingredients
To get started with your salt volcano, gather the following simple supplies:
- 1 cup room temperature water
- 1/4 cup vegetable oil
- Salt (table salt or rock salt)
- 1 clear glass jar or cup
- Optional: Food coloring (red, orange, or yellow for fiery effect)
Instructions
Prepare the Base:
Begin by filling your clear jar or cup about three-quarters full with room temperature water. This forms the foundation of your volcano and allows for maximum visibility during the reaction.
Add the Oil Layer:
Gently pour in 1/4 cup of vegetable oil. Wait until the oil fully separates and floats above the water. This top layer acts as the “volcano’s surface” and sets the stage for the bubbling eruption.
Optional Color Boost:
If you’d like to make the experiment even more eye-catching, add a few drops of food coloring to the oil. Choose colors like red, orange, or yellow to mimic the fiery look of real lava. Watch as the drops float briefly on top before falling and trailing color into the water layer below.
Erupt the Volcano:
Here’s where the science happens. Sprinkle salt slowly into the jar. As the salt falls, it drags some oil down with it into the water. Then, as the salt dissolves, the oil is released and rises back to the top in beautiful, bubbling streams—just like a real volcanic eruption.
Repeat and Explore:
You can continue the eruption by adding more salt bit by bit. This is a great opportunity to experiment further—try different types of salt (like sea salt or rock salt) and observe how each affects the reaction in terms of bubble size and speed.
Benefits of This Craft
This DIY science activity offers a wide range of developmental and educational benefits for children:
- Hands-on Learning: Children actively engage with the process, promoting better understanding of density, buoyancy, and chemical reactions.
- Visual Stimulation: The colorful eruption captures attention and encourages curiosity about how different elements interact.
- Creativity and Exploration: With options to add color and vary ingredients, kids can personalize their volcano while testing new ideas.
- Cognitive Skills: Kids develop critical thinking and observational skills as they hypothesize outcomes and observe cause-and-effect relationships.
- Safe and Accessible: Using household ingredients, this experiment is safe for young children with adult supervision and can be performed at home or in the classroom.
Tips
To get the most out of your salt volcano experiment, consider the following helpful tips:
- Use a tall, narrow glass: This helps concentrate the reaction, making the bubbling effect more dramatic and easier to observe.
- Avoid over-pouring salt: Add salt slowly to avoid clumping and to prolong the eruption.
- Try different food color combinations: Layer multiple colors to see vibrant, swirling effects in the water.
- Let the kids take notes or draw what they see: This can turn the experiment into a mini science journal project.
- Clean up easily with warm water: The oil and food coloring can be easily washed out of the jar after the experiment is done.
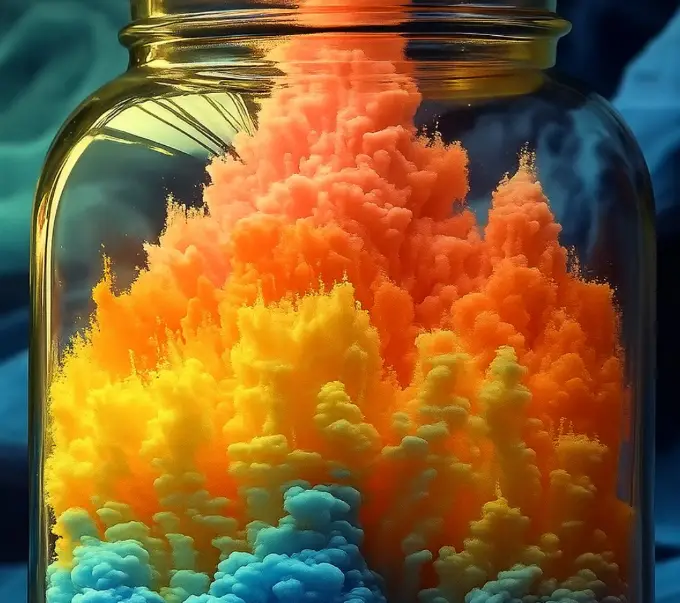
What Does It Look Like?
The reaction creates a mesmerizing display that looks much like a lava lamp in motion. When the salt is added, it triggers a rising and falling motion of oil bubbles that appear to be erupting through the colorful water. The food coloring adds dramatic streaks and swirls, resembling glowing magma against the contrasting oil layer. The visual effect is both calming and exciting, making it highly engaging for children and even adults watching the reaction unfold.
How to Store
Although this experiment is best enjoyed fresh, you can store the jar for short-term reuse:
- Leave it uncovered: Let the oil and water settle and keep the jar on a stable surface if you want to revisit it later in the day.
- Re-use within the same day: The layers can be reused for multiple eruptions by simply adding more salt. However, over time, the water may become cloudy due to dissolved salt and dispersed food coloring.
- Dispose responsibly: Once finished, discard the mixture down the drain using hot water and soap to break up the oil. Alternatively, pour into a container for waste oil disposal.
The Salt Volcano Experiment is a simple yet powerful way to introduce children to scientific concepts using everyday materials. It’s fun, safe, affordable, and highly customizable. Whether you’re a parent looking for engaging activities or a teacher crafting interactive lessons, this project never fails to fascinate and inspire. The erupting oil bubbles not only mimic the beauty of nature but also spark curiosity and creativity in every child who tries it.
For even more creative and educational projects like this, check out More DIY craft ideas on our blog.
FAQ
Can I use sea salt or rock salt instead of table salt?
Yes, you can. Different types of salt will affect the speed and size of the eruptions. Try each type to see how they perform and compare the results.
Is food coloring necessary?
No, food coloring is optional. However, it enhances the visual experience, especially if you want to simulate a fiery volcano.
Can I reuse the same jar multiple times?
Yes. Just let the mixture settle between eruptions and keep adding small amounts of salt. Replace the water and oil if it becomes too murky.
Is this activity safe for toddlers?
With adult supervision, it is generally safe. Be cautious of glass jars and avoid ingestion of any ingredients.
What’s the science behind the experiment?
The experiment demonstrates density and solubility. Salt is denser than oil and water, so it sinks, dragging oil with it. Once the salt dissolves in water, the oil (which is less dense) floats back to the surface, creating bubbles.