Spring Flower Sensory Bottle: A Fun Nature-Inspired DIY for Kids
Bringing the outdoors inside is always a delightful experience, especially for children who love to explore textures, colors, and movement. The Spring Flower Sensory Bottle is a perfect way to capture the magic of spring and turn it into a calming, creative craft that both entertains and educates. Using fresh flowers, shimmering glitter, and decorative elements, this easy DIY project transforms a simple plastic bottle into a mesmerizing sensory experience.
Ideal for springtime play, classroom activities, or even quiet time at home, this craft encourages children to connect with nature while expressing their artistic side. It’s also a wonderful way to introduce younger kids to sensory play, which helps develop fine motor skills, visual tracking, and emotional regulation.
Table of Contents
Ingredients
To make your own Spring Flower Sensory Bottle, you’ll need the following supplies:
- 1 plastic bottle with a secure lid
- Freshly picked dandelions and daisies
- Glitter
- Acrylic gems
- Green PVC insulating tape
- Blue PVC insulating tape
- Plain paper
- Clear sticky tape
These materials are simple and accessible, and many of them may already be available at home. The addition of flowers gives this sensory bottle its seasonal charm, making it an engaging project for spring afternoons.
Instructions
- Begin by preparing your flowers. Gently remove the stems from your freshly picked dandelions and daisies, and place the petals inside the bottle. Try to fill it loosely so the flowers have room to float freely.
- Add a sprinkle of glitter to the bottle for a bit of sparkle. You can choose colors that match the flowers or go for a magical rainbow mix.
- Toss in a handful of acrylic gems. These will catch the light and create a dazzling effect as the bottle is shaken.
- Fill the bottle with water, stopping just before the top to allow space for movement. Make sure everything is submerged.
- Secure the lid tightly to prevent leaks. Wrap green insulating tape around the lid to hold it in place and add a decorative touch.
- Wrap the upper part of the bottle with blue PVC insulating tape to represent the sky. This adds a nice visual backdrop for the floating elements.
- Cut out cloud shapes from plain paper and attach them to the bottle using clear sticky tape. This enhances the sky theme and encourages imaginative play.
- Create grass blades by cutting long, thin triangles from the green tape. Stick these around the bottom of the bottle to resemble a grassy field.
- Reinforce the grass with green or clear tape to ensure it stays in place even during energetic play.
- Give the bottle a good shake and watch the flowers, gems, and glitter swirl together. Let kids explore how the items move and settle.
This project is a hands-on sensory experience that children can enjoy again and again. It can also be customized with different flowers, colors, or additional decorations.
Benefits of This Craft
The Spring Flower Sensory Bottle offers several developmental and emotional benefits for children and families:
- Promotes sensory exploration: Watching the elements move and sparkle in the water provides visual stimulation and helps kids learn about cause and effect.
- Encourages creativity: Children can personalize their bottles with their favorite colors, flowers, or shapes, helping to nurture artistic expression.
- Supports calm and focus: Sensory bottles are often used as calming tools for children, especially those with sensory processing needs or anxiety.
- Inspires connection to nature: Picking flowers and using natural materials fosters appreciation for the outdoors and seasonal change.
- Simple and affordable: The materials are low-cost, easy to find, and reusable, making it accessible for families, teachers, and caregivers.
Whether you’re making one bottle or several for a group activity, this craft combines fun and learning in a beautiful way.
Tips
Here are a few helpful tips to get the best results from your Spring Flower Sensory Bottle:
- Use a clear, sturdy bottle for better visibility and longer durability. Recycled water bottles or clear plastic jars work well.
- Pick fresh flowers shortly before crafting to ensure they look their best. Dandelions and daisies hold up well in water.
- Avoid overfilling with decorations. Leaving room for the items to move freely enhances the visual effect.
- Hot glue the lid shut if you’re giving the bottle to a younger child, to ensure no water or small parts can spill out.
- Customize for the seasons. In summer, try sunflower petals. In autumn, use red and orange leaves. This craft adapts easily throughout the year.
Encourage children to narrate what they see or create stories about their floating flowers and glittering gems to build language and storytelling skills.
What Does It Taste and Look Like?
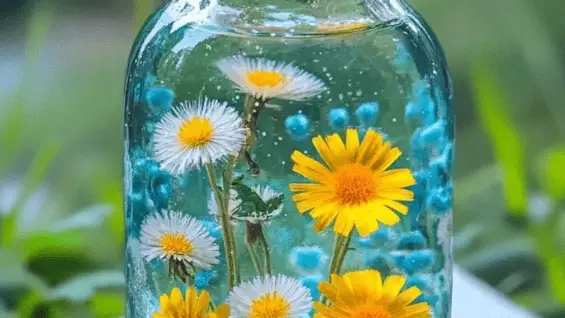
This is not an edible project, but describing the visual appeal helps paint a picture of the finished result. The Spring Flower Sensory Bottle looks like a miniature spring garden captured in water. The floating petals drift gently with each shake, while the glitter creates sparkling trails reminiscent of fairy dust. The acrylic gems reflect light and add color and texture to the display.
With the blue tape mimicking the sky and the green tape forming grassy tufts, the bottle takes on the look of a blooming meadow. The added paper clouds enhance the whimsical effect, making this a beautiful craft to display on a windowsill, shelf, or desk.
How to Store
Keeping your sensory bottle in good condition ensures it can be enjoyed for weeks to come:
- Store upright in a safe location to prevent leakage.
- Keep out of direct sunlight, which may fade the flowers and cause condensation inside the bottle.
- If flowers begin to wilt or discolor after several days, you can empty the bottle and refresh it with new materials.
- Check the lid periodically to ensure it’s still tightly sealed, especially if children are using the bottle frequently.
Sensory bottles can last for days or weeks depending on the freshness of the flowers and how they are stored.
The Spring Flower Sensory Bottle is a beautiful blend of nature, creativity, and sensory play. Easy to make and endlessly customizable, this DIY craft is a gentle introduction to the changing seasons and a fun way for kids to engage with their environment. Whether used in a classroom, therapy session, or at home, the sensory bottle invites calm, wonder, and artistic expression.
For anyone looking to bring a bit of spring indoors or offer kids a soothing activity that doubles as a decorative craft, this project is an excellent choice. It only takes a few materials and a few minutes to create something magical.
If you’re excited to try more hands-on projects like this, visit More DIY craft ideas for a wide range of creative and educational activities to explore with your kids.
FAQ
What age is this sensory bottle suitable for?
It’s great for toddlers to school-aged children. Just ensure the lid is tightly sealed if used by younger children.
Can I use fake flowers instead of fresh?
Yes. Fake flowers can provide longer-lasting visuals, but fresh flowers give a more authentic, seasonal feel.
How long will the bottle last before needing a refresh?
Depending on how fresh the flowers are, the bottle can last a few days to over a week. Refresh with new water and petals as needed.
Can I use oil instead of water for a different effect?
While oil gives a slower motion effect, it may not mix well with all materials. Stick to water for this version to keep it safe and clean.
Is it okay to add small toys or beads?
Absolutely. Just make sure they are waterproof and won’t disintegrate or bleed color into the water.