Water Marbled Ornaments DIY Craft Guide
Water marbled ornaments are a simple yet stunning way to add artistic flair to your holiday décor. With just a few basic supplies and a splash of creativity, you can transform plain ornaments into vibrant marbled treasures. Whether you’re preparing for Christmas, creating handmade gifts, or just exploring a new craft, this DIY technique offers fun, customization, and satisfaction in every swirl.
Table of Contents
Ingredients
To get started on your marbling journey, gather the following supplies:
- Clear or white ornaments (plastic or glass)
- Nail polish (variety of colors – fast-drying works best)
- Disposable container or plastic tub (deep enough to dip ornaments)
- Toothpicks or skewers (for swirling polish)
- Room temperature water
- Rubber gloves (optional, but helpful)
- Wax paper or drying rack
- Optional: ribbon, glitter, or metallic polish for accents
Instructions
- Prep your workspace: Lay down some wax paper and pop on those gloves if you’re using them. Fill your container about ¾ full with room temperature water.
- Add nail polish: Start dripping nail polish gently onto the surface of the water. Mix it up with several colors, adding one drop at a time for that vibrant marbled effect.
- Swirl the design: Grab a toothpick and carefully swirl the polish into a beautiful marbled pattern. Remember, you need to work quickly because polish can dry fast.
- Dip the ornament: Take your ornament by its top or hold it with a skewer inserted. Slowly dip it into the water where the polish is floating, give it a slight twist, and then lift it out.
- Let it dry: Lay the ornament on your wax paper or hang it to dry for a few hours to let those gorgeous colors set.
- Repeat or seal (optional): Feel free to add more layers if you want a bolder look, or spray with a clear sealant to protect your masterpiece. Don’t forget to tie on a beautiful ribbon for hanging.
Benefits of This Craft
This DIY project brings many advantages beyond just beautiful décor. Here’s why water marbled ornaments are a favorite among crafters of all ages:
- Budget-Friendly: The materials are inexpensive and often already available at home.
- Creative Expression: No two ornaments will be the same. You can experiment endlessly with color and design.
- Easy for Beginners: You don’t need advanced artistic skills to succeed with this project.
- Family-Friendly: This makes an excellent activity for kids, especially when supervised by an adult.
- Gift-Worthy: Handmade gifts carry personal meaning, and marbled ornaments are both useful and decorative.
Tips
To ensure your water marbling project turns out just right, keep these tips in mind:
- Work quickly—nail polish dries fast on water. Prepare your color scheme before starting.
- Stick to room temperature water. Cold or hot water may prevent the polish from spreading correctly.
- Avoid using “quick-dry” polish if possible. Fast-drying is fine, but ultra-quick formulas may dry before swirling.
- Clean the surface between dips with a skewer to avoid transferring dried polish onto your next ornament.
- Use skewers inserted into the ornament hole for easy handling and less mess.
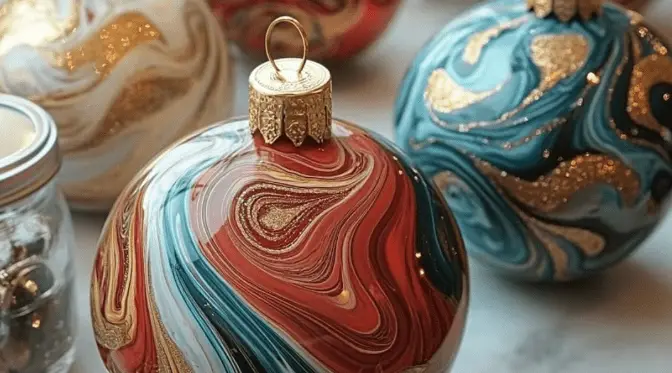
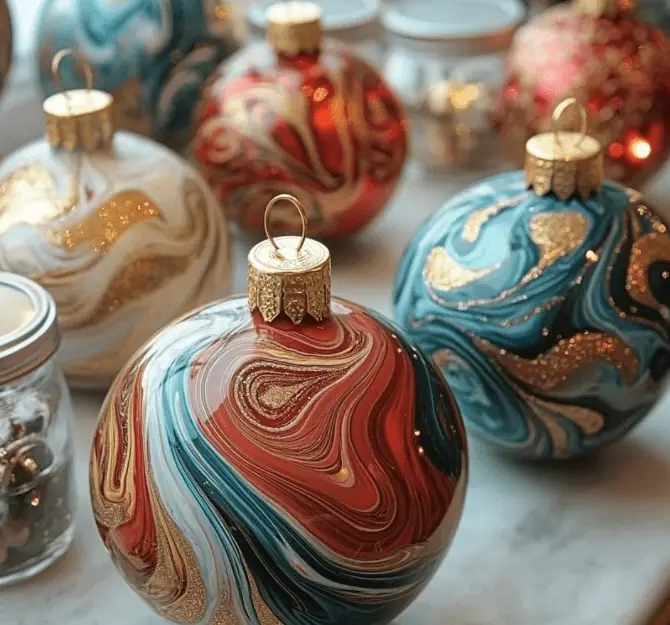
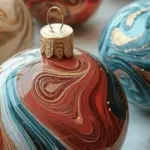
What Do They Look Like?
Water marbled ornaments create striking, abstract visuals. When completed, each ornament looks like a floating galaxy or a miniature piece of fluid art. Depending on your color choice, they can appear whimsical, elegant, metallic, or bold. Clear ornaments allow light to pass through the marbled finish, producing a radiant effect when hung on a Christmas tree or placed under string lights.
The marbled effect is glossy and dimensional, often mimicking the flow of water or clouds. These ornaments stand out on any holiday display and make wonderful centerpieces when paired with complementary decor.
How to Store
To preserve the beauty of your water marbled ornaments for future seasons:
- Make sure they are completely dry before handling or storing.
- Wrap each ornament in tissue paper or bubble wrap to prevent scratches or breakage.
- Store them in a divided ornament box to avoid them touching each other.
- Keep the container in a cool, dry place, out of direct sunlight, which can fade colors over time.
- If you used a sealant, your ornament will be more durable and resistant to wear.
Water marbled ornaments offer a perfect combination of ease, fun, and eye-catching results. They’re great for holiday decorating, handmade gift-giving, or simply exploring your creative side. With minimal materials and a few simple steps, you can create a collection of festive, colorful ornaments that reflect your personal style.
Whether you’re crafting solo or with friends and family, this project delivers satisfaction and festive charm. So gather your supplies, pick your favorite polish colors, and start dipping your way to holiday magic.
For More DIY craft ideas, visit this link. You’ll find dozens of fun, family-friendly crafts to spark your creativity all year long.
FAQ
Can I use old nail polish for water marbling?
Yes, but ensure it’s still fluid and not clumpy. Thick or dried-out polish won’t spread properly on the water.
Do I have to use clear ornaments?
Clear or white ornaments work best as they show the marbled colors most vibrantly. You can experiment with other light colors as well.
Is it safe for children to do this craft?
Yes, but always with adult supervision. Nail polish should be used in a well-ventilated area, and children should avoid inhaling fumes or touching polish directly.
What kind of container should I use for dipping?
Use a disposable plastic tub or container deep enough to submerge your ornament. Avoid containers you intend to reuse for food.
Can I use a clear spray sealant after marbling?
Yes, a clear acrylic sealant spray can help preserve the design and give your ornament extra durability and shine.
Water Marbled Ornaments DIY Craft Guide
- Total Time: Up to 1 hour (including drying)
- Yield: 1 ornament per dip
Description
Dip into color with these stunning water marbled ornaments! A fun and creative way to decorate for the holidays using just nail polish and a little imagination.
Ingredients
- Clear or white ornaments (plastic or glass)
- Nail polish (variety of fast-drying colors)
- Disposable container or plastic tub (deep enough for dipping)
- Toothpicks or skewers (for swirling)
- Room temperature water
- Rubber gloves (optional)
- Wax paper or drying rack
- Optional: ribbon, glitter, or metallic nail polish for accents
Instructions
- Prepare your space: Cover your area with wax paper and put on gloves. Fill the container ¾ full with room temperature water.
- Drip the polish: Drop different colors of nail polish onto the water’s surface one at a time. Work quickly as it starts to dry fast.
- Swirl your pattern: Use a toothpick to gently swirl the polish into your desired marbled effect.
- Dip the ornament: Hold the ornament by its top or with a skewer and slowly dip it into the swirled polish. Rotate slightly, then lift out.
- Dry completely: Set the ornament on wax paper or hang it to dry for several hours.
- Finish and display: Optional—add another layer or spray with sealant. Tie with a ribbon and hang on your tree or gift as a handmade treasure.
Notes
Use room temperature water for best results. Try working in a well-ventilated area due to nail polish fumes. Each ornament will be uniquely beautiful!
- Prep Time: 10 minutes
- Cook Time: undefined
- Category: Holiday Craft
- Method: Water Marble Dipping
- Cuisine: N/A
Nutrition
- Serving Size: N/A
- Calories: 0
- Sugar: 0g
- Sodium: 0mg
- Fat: 0g
- Saturated Fat: 0g
- Unsaturated Fat: 0g
- Trans Fat: 0g
- Carbohydrates: 0g
- Fiber: 0g
- Protein: 0g
- Cholesterol: 0mg
Keywords: water marbled ornaments, DIY Christmas crafts, nail polish crafts, homemade holiday decorations, marbling ornament tutorial