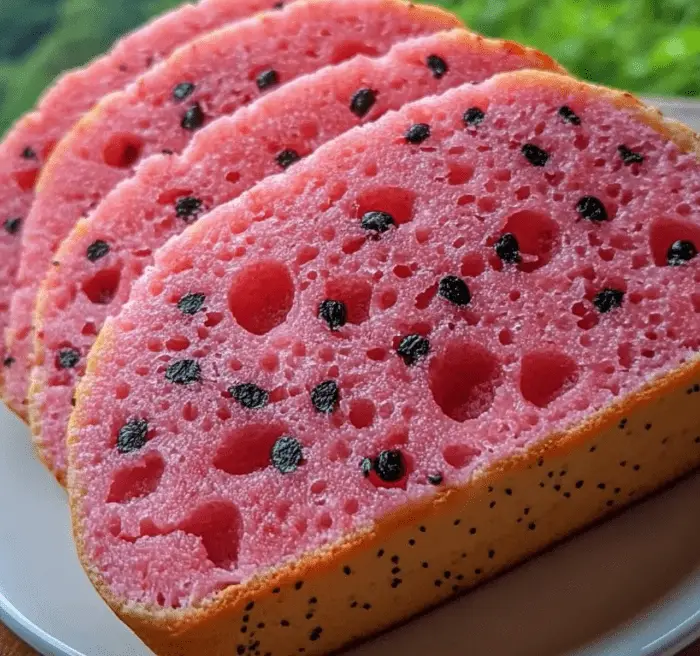
Watermelon Bread: A Refreshing and Colorful Twist on Classic Baking
If you’re searching for a unique homemade treat to enjoy during warm weather—or any time you want a fruity, cheerful bake—this Watermelon Bread is sure to impress. With its naturally sweet flavor, vibrant appearance, and soft texture, this loaf is a fun departure from traditional quick breads. Whether served at a summer brunch, packed for a picnic, or enjoyed with an afternoon cup of tea, watermelon bread adds both novelty and nostalgia to your table.
This recipe is straightforward, requiring only simple ingredients and minimal preparation time. What makes it special is the use of fresh watermelon puree, which gives the bread a natural sweetness, subtle fruity aroma, and beautiful pink hue. For extra color, a drop of red food coloring enhances the visual appeal, while raisins offer the option of adding extra texture and sweetness.
Ingredients
- 1 1/2 cups watermelon chunks
- 1/2 cup butter, softened
- 2 eggs
- 3/4 cup sugar
- 2 cups flour
- 2 teaspoons baking powder
- 1/4 teaspoon salt
- 1/2 cup raisins (optional)
- 1 teaspoon red food coloring (optional)
Instructions
Step 1: Preheat the Oven
Start by preheating your oven to 350°F (175°C). Grease and flour a 9×5-inch loaf pan or line it with parchment paper for easy removal.
Step 2: Prepare the Watermelon Puree
Blend the watermelon chunks until smooth in a food processor or blender. Measure out 1 cup of the puree and set it aside.
Step 3: Combine Wet Ingredients
In a large mixing bowl, cream together the softened butter and sugar until light and fluffy. Beat in the eggs, then stir in the measured watermelon puree. If using, add the red food coloring to intensify the pink color.
Step 4: Mix Dry Ingredients
In a separate bowl, whisk together the flour, baking powder, and salt. Slowly add the dry ingredients to the wet mixture, stirring just until combined. Avoid overmixing to keep the bread soft and tender.
Step 5: Add Optional Raisins
If you enjoy a little chewy sweetness in your bread, fold in the raisins now. They give the bread extra depth and are a great way to mimic watermelon seeds.
Step 6: Bake the Bread
Pour the batter into the prepared loaf pan and spread it evenly. Bake in the preheated oven for about 1 hour, or until a toothpick inserted into the center comes out clean.
Step 7: Cool and Serve
Let the bread cool in the pan for 10–15 minutes, then transfer it to a wire rack to cool completely before slicing. This helps the texture set properly and prevents crumbling.
Benefits of This Craft
Making Watermelon Bread isn’t just about baking—it’s about enjoying the process of transforming a beloved summer fruit into a baked delight. Here’s why this craft is so rewarding:
- Seasonal delight: Watermelon is iconic during hot months, and using it in bread form is a fun and unexpected way to celebrate the season.
- Kid-friendly activity: Children will love helping with blending watermelon and mixing the bright pink batter, making this a great family baking project.
- Nutrient-rich twist: Watermelon adds moisture and a subtle source of vitamins like A and C, making the bread not just tasty but nourishing.
- Versatile serving: This bread is perfect for breakfast, brunch, snacks, or dessert. Serve plain or with a smear of cream cheese or butter.
- Visually appealing: With or without food coloring, this bread’s color and light texture make it an eye-catching addition to any table.
Tips
For best results and a foolproof baking experience, consider the following tips:
- Use seedless watermelon: To avoid bitterness and excess moisture, start with fresh seedless watermelon chunks.
- Measure the puree: Always measure out exactly 1 cup of puree after blending. Extra liquid can make the batter too thin and affect the final texture.
- Drain if necessary: If your watermelon is especially juicy, allow the puree to sit and drain a little before measuring to ensure consistency.
- Don’t overmix: Gently fold the dry ingredients into the wet batter to keep the loaf light and airy.
- Customize the flavor: Add a dash of vanilla or a sprinkle of cinnamon for a subtle flavor twist.
- Cool completely before slicing: Cutting too early can make the bread fall apart. Allowing it to cool gives the crumb time to firm up.
What Does It Taste Like?
Watermelon Bread offers a lightly sweet, fruity flavor with a tender, moist crumb. The watermelon doesn’t overpower—it’s a subtle presence that adds freshness and moisture rather than a bold taste. The butter and sugar balance the flavor, while the eggs and flour give structure to the loaf.
If you choose to add raisins, they provide little pops of chewy sweetness that mimic watermelon seeds and add texture. The optional food coloring turns the bread into a whimsical treat, perfect for summer-themed gatherings or simply brightening up your breakfast plate.
The result is a bread that tastes comforting yet refreshing—ideal for those who enjoy traditional quick breads but want something a little different and seasonal.
How to Store
Proper storage is key to maintaining the freshness and texture of your Watermelon Bread. Here’s how to store it:
- Room temperature: Once completely cooled, wrap the bread tightly in plastic wrap or aluminum foil and store in an airtight container. It will keep fresh for up to 2 days.
- Refrigerator: If you need to keep it longer, refrigerate the wrapped bread for up to 5 days. Let it come to room temperature or warm slightly before serving for best texture.
- Freezer: For extended storage, wrap individual slices or the entire loaf in plastic wrap and place in a freezer bag. Freeze for up to 2 months. Thaw at room temperature or reheat gently in a toaster oven.
- Avoid excess moisture: Make sure the bread is fully cooled before wrapping, as residual heat can create condensation and make it soggy.
This Watermelon Bread recipe proves that summer baking can be as creative as it is delicious. It brings together the sweetness and freshness of watermelon with the comforting texture of quick bread, offering something that’s fun to make and satisfying to eat. Whether you’re trying it out as a seasonal novelty or incorporating it into your regular recipe rotation, this loaf is bound to become a warm-weather favorite.
The colorful presentation, customizable ingredients, and easy preparation make it accessible for all levels of bakers. Serve it as part of brunch, gift it to a friend, or keep a loaf on hand for spontaneous summer snacking. It’s a simple yet impressive recipe that celebrates one of summer’s most iconic fruits.
Looking to explore more recipes like this one? Check out our More DIY craft ideas for daily inspiration and delicious ideas that turn everyday ingredients into something extraordinary.
FAQ
Can I use frozen watermelon?
Yes, but thaw it fully and drain excess liquid before blending to avoid overly wet batter.
Do I have to use food coloring?
No. It’s purely optional and only affects the color. The bread will still taste great without it.
Can I replace the raisins with chocolate chips?
Yes. Mini chocolate chips can be a delicious substitute for a sweeter version of the bread.
Why is my bread too wet or dense?
Make sure you’re not using more than 1 cup of watermelon puree and avoid overmixing the batter.
What can I use instead of butter?
You can substitute with an equal amount of vegetable oil or coconut oil for a dairy-free version.
Can I make this gluten-free?
Yes. Use a 1:1 gluten-free flour blend. Check that your baking powder is also gluten-free.
Is it very sweet?
The sweetness is moderate. You can adjust by reducing the sugar slightly or skipping the raisins.
How do I know it’s fully baked?
A toothpick inserted into the center should come out clean or with only a few crumbs, not wet batter.
Can I make this into muffins instead of a loaf?
Absolutely. Divide the batter into a greased muffin tin and bake at 350°F for 20–25 minutes.
What’s the texture like?
Soft, moist, and lightly crumbly—similar to banana bread but with a fresh fruity note from the watermelon.